Category: Fall Dishes

  • Instant Pot Thanksgiving Turkey Breast with Gravy

    As the holiday season approaches, why not simplify your Thanksgiving feast without sacrificing flavor? In this blog post, we’re diving into the world of convenience and culinary excellence with our Instant Pot Thanksgiving Turkey Breast with Gravy. Get ready to revolutionize your holiday cooking experience, achieving a succulent turkey breast with a rich, flavorful gravy—all in a fraction of the time. This idea came from Food Network https://www.foodnetwork.com/recipes/food-network-kitchen/instant-pot-thanksgiving-turkey-breast-with-gravy-5500375.

    PREP TIMES:

    Prep Time: 30 mins
    Cook Time: 2 hours 10 mins
    Total Time: 2 hours 40 mins

    Ingredients

    • 1 tablespoon light brown sugar
    • 1 tablespoon chopped fresh sage 
    • 1 tablespoon chopped fresh thyme
    • 1 teaspoon chopped fresh rosemary
    • 1 clove garlic, finely grated
    • Kosher salt and freshly ground black pepper
    • 2 skin-on, boneless turkey breasts (about 2 1/2 pounds each)
    • 7 tablespoons unsalted butter
    • 1/2 cup all-purpose flour
    • 1/2 cup dry white wine
    • 2 cups turkey stock or low-sodium chicken broth

    Directions

    1. Whisk the sugar, sage, thyme, rosemary, garlic, 5 teaspoons salt and 1/2 teaspoon pepper in a small bowl until combined.
    2. Starting on the top edge of one turkey breast, gently lift the skin to separate it from the meat, but leave a 1/2-inch border around the perimeter where it’s still attached to the breast. (You want to make a pocket to hold all the herbs and seasonings.) Stuff half of the herb mixture underneath the skin, massaging it into the flesh and evenly distributing it over the surface of the meat. Repeat with the remaining turkey breast and herb mixture. Let sit uncovered at room temperature for at least 1 hour or wrapped tightly in plastic and chilled for up to 3 days. 
    3. Melt 6 tablespoons butter in a 6- or 8-quart Instant Pot® set to the high saute setting (see Cook’s Note). Add the flour and cook, stirring constantly, until the roux is deep golden brown and smells nutty, 4 to 6 minutes; scrape into a heatproof bowl and set aside (the roux will continue to darken as it sits).
    4. Add the remaining tablespoon butter and, working one breast at a time, cook skin-side down, undisturbed, until deep golden brown, 6 to 8 minutes; transfer to a baking sheet. Repeat with the remaining breast. Add the wine to the pot to deglaze, scraping up any browned bits from the bottom, and cook until you can’t smell alcohol and the wine smells fruity and sweet, 3 to 4 minutes. Add the stock, place the rack in the pot and position both breasts on the rack side by side to evenly cook. 
    5. Follow the manufacturer’s guide for locking the lid and preparing to cook. Set to pressure cook on the high pressure setting for 15 minutes. After the pressure-cook cycle is complete, follow the manufacturer’s guide for quick release and wait until the quick-release cycle is complete. Being careful of any remaining steam, unlock and remove the lid. 
    6. Transfer the turkey to a baking sheet and let sit uncovered while you make the gravy. 
    7. Set the Instant Pot® to the high saute setting and bring the cooking liquid to a boil. Whisk in the roux and cook until the gravy boils and thickens, about 5 minutes. Turn off. 
    8. Cut the turkey crosswise into 1/2-inch-thick slices and top with the gravy.
  • Sizzling Delight: Elevate Your Feast with Bacon Hasselback Potatoes Perfection

    Prepare to dazzle your taste buds and elevate your dining experience with our latest blog post, dedicated to the art of crafting Bacon Hasselback Potatoes. This show-stopping side dish is not just a feast for the palate but also a visual delight that will steal the spotlight at any gathering. In this blog, we’ll take you on a culinary journey, uncovering the secrets to achieving the perfect blend of crispy bacon, golden potatoes, and savory goodness. This was possible thanks to Food Network Magazine!

    PREP TIMES:

    Prep Time: 50 mins
    Cook Time: 2 hours 10 mins
    Total Time: 3 hours

    Ingredients

    • 4 slices thick-cut bacon, each cut crosswise into 9 pieces
    • Kosher salt
    • 12 medium Yukon gold potatoes, peeled
    • 1 stick unsalted butter
    • Sea salt and freshly ground pepper
    • 2 scallions, finely chopped
    • 2 tablespoons finely chopped fresh parsley
    • 1 clove garlic, finely chopped

    Directions

    1. Lay the bacon pieces on a baking sheet and freeze until hard, about 30 minutes. Meanwhile, preheat the oven to 350 degrees F. Bring a large pot of salted water to a boil. 
    2. Using a sharp knife, make crosswise cuts in each potato, about 1/8 inch apart, stopping about 1/4 inch from the bottom. 
    3. Add the potatoes to the boiling water and cook 4 minutes. Remove with a slotted spoon and carefully transfer to a baking sheet; let cool slightly. Pat the potatoes dry, then insert 3 pieces of the frozen bacon into the cuts of each potato, spacing the bacon evenly and letting it poke out of the top. Melt 5 tablespoons butter and brush generously over the potatoes and in the cuts. Reserve any excess butter for basting. Season the potatoes with salt and pepper. 
    4. Transfer the potatoes to the oven and bake until the outsides are browned and crisp, about 2 hours, basting halfway through with the reserved melted butter. 
    5. When the potatoes are almost done, melt the remaining 3 tablespoons butter and mix with the scallions, parsley and garlic. Spoon over the potatoes and roast 5 more minutes. Transfer to a platter and season with salt and pepper. 
  • Whipped to Perfection: Irresistible Thanksgiving Mashed Potatoes to Savor and Share

    Step into the heart of Thanksgiving indulgence with our latest blog post dedicated to the art of making irresistibly creamy and flavorful mashed potatoes. As a quintessential side dish, mashed potatoes have the power to elevate your Thanksgiving feast to new heights. In this blog, we’ll guide you through the process of creating mashed potatoes that are not just a side dish but a star on your holiday table. Thank you Sarah Mastracco from https://www.foodnetwork.com/recipes/food-network-kitchen/baked-feta-mashed-potatoes-11241096 for this wonderful recipe!

    PREP TIMES:

    Prep Time: 30 mins
    Cook Time: 1.5 hours
    Total Time: 2 hours

    Ingredients

    • 6 tablespoons unsalted butter, cut into cubes, plus more for the dish
    • 4 pounds russet potatoes, peeled, quartered lengthwise and sliced into 1/4-inch-thick pieces 
    • 2 cups half-and-half  
    • Kosher salt and freshly ground black pepper 
    • One 7-ounce block feta cheese 
    • 1/2 cup sour cream 
    • 1 tablespoon chopped chives

    Directions

    1. Preheat the oven to 400 degrees F. Grease a 9-by-13-by-2-inch (3.75-quart) casserole dish with butter.
    2. Put the potatoes in the prepared casserole dish, add the half-and-half and stir to combine. Spread the potatoes in an even layer and place the block of feta in the center, on top of the potatoes. Season with 1 tablespoon salt and a few grinds of pepper and dot the butter over the potatoes. Cover the casserole with aluminum foil and bake until the half-and-half is simmering, the cheese is bubbling and the potatoes are cooked through and very tender when pierced with a small sharp knife, about 1 hour and 20 minutes. 
    3. Remove and reserve the aluminum foil. Use a potato masher to mash the ingredients in the casserole dish until well combined, smooth and fluffy. Fold in the sour cream and season with salt and pepper. Cover the mashed potatoes with the reserved foil and return to the oven until warmed through, about 10 minutes. Top with the chopped chives and a few grinds of pepper.  
  • Gravy Magic: Crafting the Perfect Homemade Elixir for Flavorful Feasts

    Add a touch of culinary magic to your table with our Homemade Gravy recipe. Gravy is the unsung hero of the holiday feast, bringing together flavors and textures to enhance every dish on your plate. Thank you Ina Garten from https://www.foodnetwork.com/recipes/ina-garten/homemade-gravy-recipe-1940501 for this wonderful recipe!

    PREP TIMES:

    Prep Time: 5 mins
    Cook Time: 25 mins
    Total Time: 30 mins

    Ingredients

    • 1/4 pound (1 stick) unsalted butter
    • 1 1/2 cups chopped yellow onion (2 onions)
    • 1/4 cup flour
    • 1 teaspoon kosher salt
    • 1/2 teaspoon freshly ground black pepper
    • Defatted turkey drippings plus chicken stock to make 2 cups, heated
    • 1 tablespoon Cognac or brandy
    • 1 tablespoon white wine, optional
    • 1 tablespoon heavy cream, optional

    Directions

    1. In a large (10 to 12-inch) saute pan, cook the butter and onions over medium-low heat for 12 to 15 minutes, until the onions are lightly browned. Don’t rush this step; it makes all the difference when the onions are well-cooked.
    2. Sprinkle the flour into the pan, whisk in, then add the salt and pepper. Cook for 2 to 3 minutes. Add the hot chicken stock mixture and Cognac, and cook uncovered for 4 to 5 minutes until thickened. Add the wine and cream, if desired. Season, to taste, and serve.
  • Crafting Fruit Cornucopias for Thanksgiving

    As Thanksgiving approaches, it’s time to add a touch of whimsy to your festive spread with our delightful and easy Fruit Cornucopias. These edible horns of plenty are not only visually stunning but also a delicious addition to your Thanksgiving feast. Thank you Libby from https://cookingwithlibby.com/fruit-cornucopias-healthy-thanksgiving/ for this wonderful recipe!

    Ingredients

    • 1 cup blueberries (washed and dried)
    • 1 cup Mandarin oranges
    • 1 cup raspberries (washed and dried)
    • 1/8 cup honey
    • 6 ice cream cones (with pointy bottoms)
    • 1/8 cup pumpkin seeds (or sunflower seeds, optional)


    Instructions

    • Starting with one ice cream cone, fill the inside with your choice of fruit.
    • Place pumpkin or sunflower seeds inside if desired.
    • With a spoon, drizzle a few lines of honey on the top.
    • Eat immediately or place in the fridge until ready to consume.
  • Thanksgiving Indulgence: Sweet and Savory Turkey Leg Treat Dessert Delight!

    Transform your Thanksgiving dessert table with the whimsical charm of Sweet and Savory Turkey Leg Treats! This innovative dessert takes the iconic turkey leg shape and infuses it with a delightful blend sweets created by Nicole from https://simpleandseasonal.com/turkey-leg-treats/

    PREP TIMES:

    Prep Time: 30 mins
    Cook Time: 5 mins
    Total Time: 35 min

    Ingredients

    • 6 pretzel rods
    • 1 bag (12 oz) white candy melts (or 1 cup vanilla baking chips)
    • 1 bag (10 oz) mini marshmallows (set aside 24)
    • 8 cups Cocoa Krispies cereal
    • 1/4 cup butter

    Instructions

    • 6 pretzel rods,1 bag (12 oz) white candy meltsBreak the pretzel rods in half and melt the candy according to package directions. (I usually do 15-30 second intervals in the microwave, stirring well each time.)
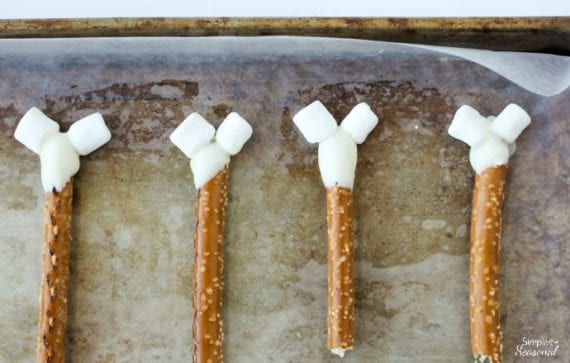
    • 1 bag (10 oz) mini marshmallowsDip the smooth end of the pretzel rod and then press two marshmallows onto the end. Repeat until 12 “bones” are dipped. Let sit for about 5 minutes.top down view of pretzel rods dipped in melting candy and mini marshmallows attached to the top
    • Dip the pretzels again, covering 2/3 of the rod. Let sit.marshmallows covered in more melting candy to look like the top of a leg bone
    • 8 cups Cocoa Krispies cereal,1/4 cup butter,1 bag (10 oz) mini marshmallowsIn a saucepan, melt the butter and marshmallows, stirring until smooth. Remove from heat and stir in cereal. Mix until coated well.
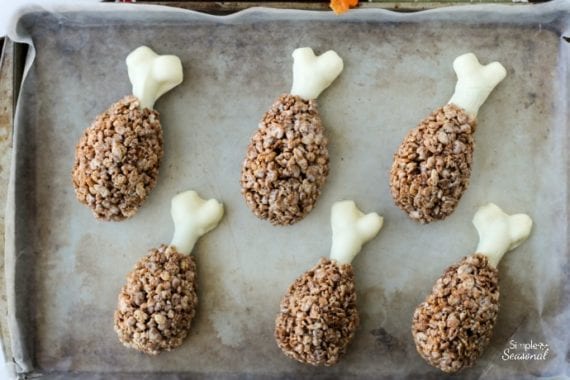
    • Allow to cool just a bit and then form the cereal mixture around each pretzel rod, forming a drumstick. Don’t try this until cooled enough, or it won’t hold its shape! Spray your hands with cooking spray to keep the marshmallow from sticking while you work. top down view of turkey legs made from cocoa krispies wrapped around dipped pretzel rods
    • Place on a wax paper lined baking sheet and let sit until fully cooled. 
  • Autumn Elegance in a Bowl: Embrace the Season with our Chawanmushi Recipe

    Fall into Flavor: Our Chawanmushi Recipe Embodies Autumn Warmth. Immerse Yourself in the Rich Harmony of Velvety Custard, Seasonal Vegetables, and Savory Broth. Thank you MARC MATSUMOTO from https://norecipes.com/chawanmushi-recipe/ for this wonderful recipe!

    PREP TIMES:

    Prep Time: 20 mins
    Cook Time: 10 mins
    Total Time: 30 mins

    Ingredients 

    • ½ cupegg (about 2 large eggs)
    • 1 ½ cupdashi
    • ¼ teaspoonsalt
    • 0.35 ouncesedamame
    • 1.76 ouncesshrimp
    • 1.76 ouncesscallops
    • 1.06 ouncesshiitake (trimmed and sliced)
    • Mitsuba (optional for garnish)
    • Ikura (optional for garnish)

    Instructions

    • Break the eggs into a bowl and beat them until uniform in color.Beat the egg with chopsticks until it is uniform in color.
    • Add the dashi, and salt and mix everything together evenly.Add the dashi stock and mix it in to the egg to make the custard.
    • Let the mixture rest until the bubbles disappear, or use a wire mesh skimmer to remove any foam on top. Strain the mixture through a fine-mesh sieve to remove any chunks of albumin or chalaza.Skim off any foam from the surface of the custard for a smooth chawanmushi.
    • Add the edamame, shrimp, scallops and shiitake (or your choice of mix-ins) into heat-safe ceramic cups or ramekins.
      Add the mix-ins for your chawanmushi to heat-safe cups.
    • Divide the egg mixture evenly between the cups, and cover them with lids, or aluminum foil.Add the custard and cover the cups with lids.
    • Bring about ½-inch of water to a boil in a pot that’s deep enough to hold the cups.
    • Lay a dishtowel at the bottom of the pot, and then place the cups on top of the towel.Steam the chawanmushi in a water bath.
    • Cover the pot with a lid and steam the Chawanmushi until the custard reaches a temperature of at least 160 degrees F or 71 C.
      The steamed egg is done when they reach a temperature of 160 degrees F.
    • Carefully remove the cups from the pot and then garnish with your choice of toppings. I used steamed shrimp, mitsuba, and ikura for mine.Garnish the chawanmushi with mitsuba, steamed shrimp and Ikura.
  • Fall into Autumn Bliss with Our Sukiyaki Recipe!

    Embrace the cozy flavors of fall with our Sukiyaki recipe, a warm and hearty Japanese hot pot. Dive into a savory blend of thinly sliced beef, vegetables, and tofu simmered in a flavorful soy-based broth. Experience the comfort of autumn with this soul-warming dish, perfect for chilly evenings.

    PREP TIMES:

    Prep Time: 20 mins
    Cook Time: 10 mins
    Total Time: 30 mins

    Ingredients

    For the Kombu Dashi (for diluting the cooking sauce; as needed)

    • 2 cups water
    • 1 piece kombu (dried kelp) (2 x 2 inches, 5 x 5 cm; 5 g per piece)

    For the Sauce (yields roughly 1⅓ cups)

    • ½ cup sake
    • ½ cup mirin
    • 3 Tbsp sugar
    • ½ cup soy sauce

    For the Sukiyaki

    • 4 leaves napa cabbage (12 oz, 340 g)
    • ¼ bunch shungiku (chrysanthemum greens) (3.5 oz, 100 g)
    • 1 Tokyo negi (naga negi; long green onion) (white part only; or 1 leek/4 green onions)
    • 6 inches gobo (burdock root) (1.6 oz, 45 g)
    • ½ onion (3.5 oz, 100 g)
    • ½ package enoki mushrooms (1.75 oz, 50 g; skip or use other mushrooms)
    • ½ package maitake mushrooms (1.75 oz, 50 g; skip or use other mushrooms)
    • 2 shiitake mushrooms (1.75 oz, 50 g; skip or use other mushrooms)
    • ½ package broiled tofu (yaki dofu) (one package is 9 oz, 255 g; or use medium-firm (momen) tofu)
    • 1½ inches carrot (optional, for decoration and color)
    • ½ package shirataki noodles (3.5 oz, 100 g; or cellophane/yam noodles)
    • ½ lb thinly sliced beef (chuck or ribeye) (or slice your own meat; skip for vegan/vegetarian and use more tofu, mushrooms, and vegetables)
    • 1 Tbsp neutral oil (or 1 small piece of suet (raw beef fat))

    For Serving

    • 2 large eggs (50 g each w/o shell) (optional, for dipping; for safety, buy pasteurized eggs or make sous vide eggs; skip for vegan)

    For the Shime Finishing Course

    • 1 serving udon noodles (cooked and drained)

    Directions

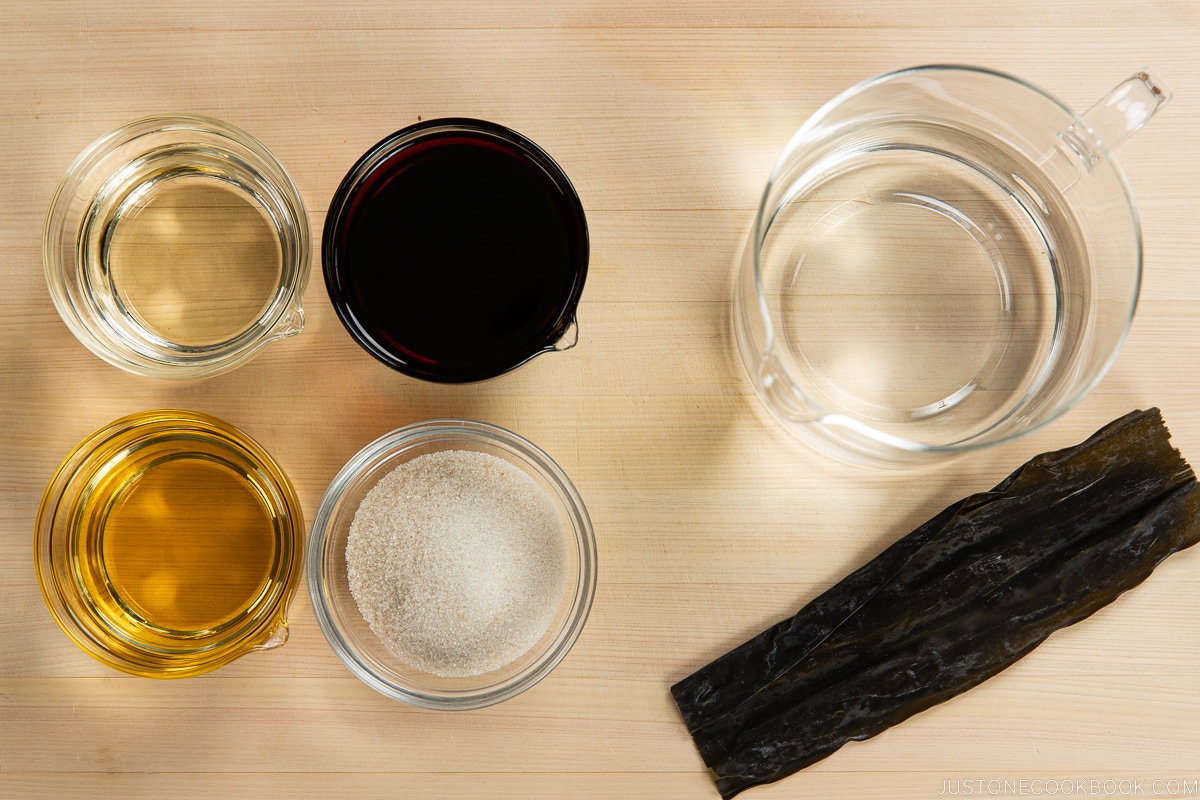
    • Gather all the dashi and sauce ingredients. Tip: You‘ll use the dashi and sauce to adjust the seasoning of the broth as you cook. This recipe makes more dashi than you need for this dish and you‘ll likely have leftovers.Sukiyaki Ingredients 1
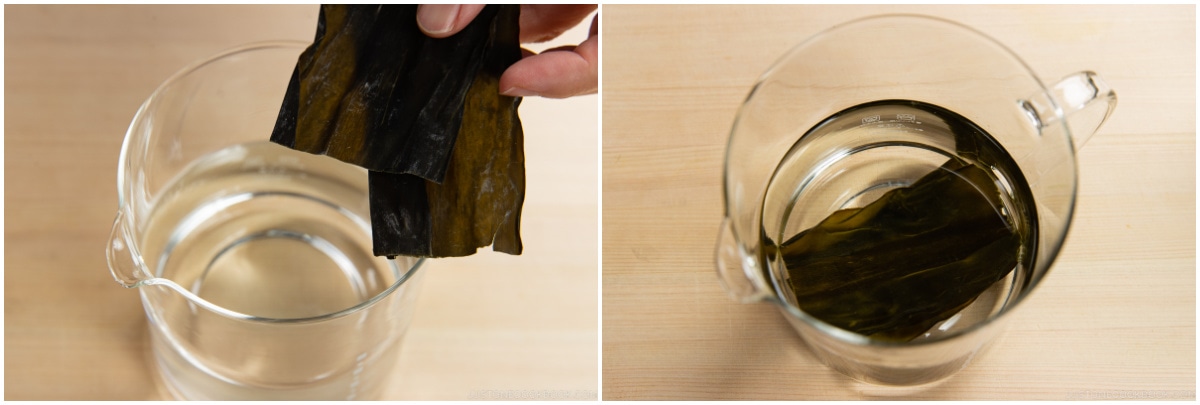
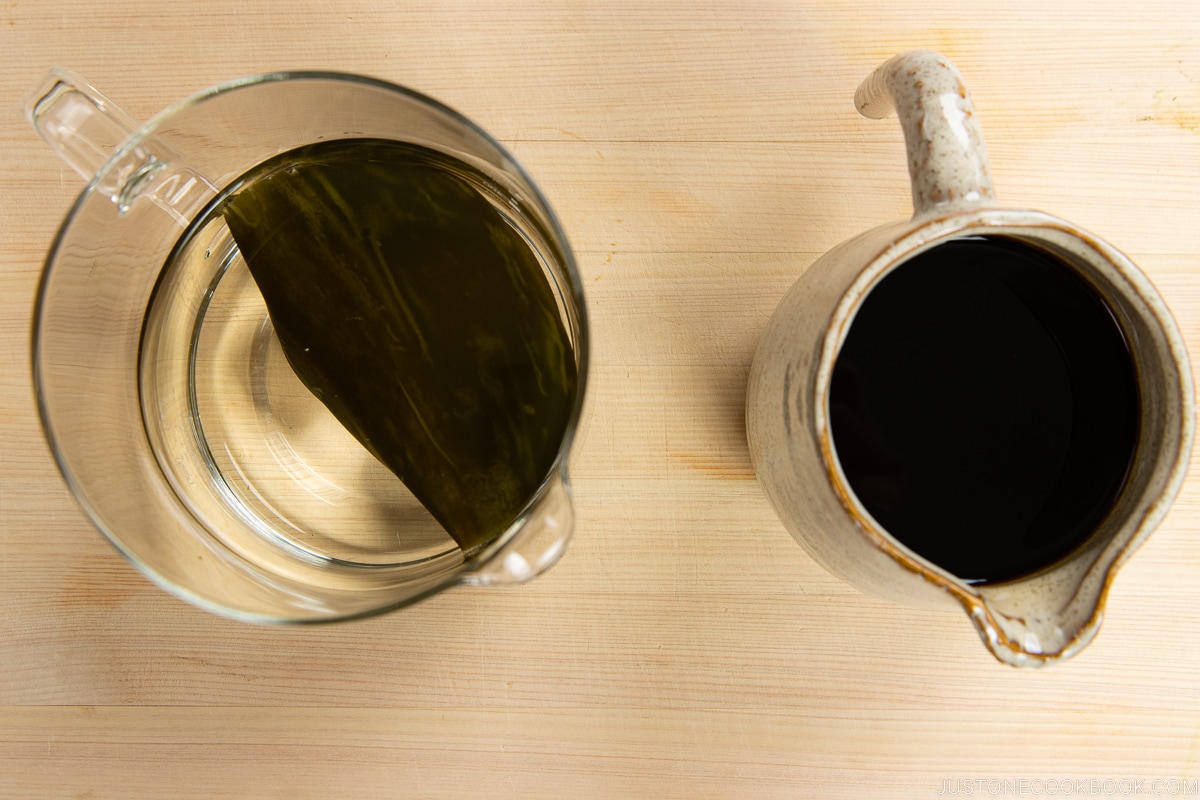
    • To make the cold brew Kombu Dashi, put 2 cups water and 1 piece kombu (dried kelp) in a measuring cup or pitcher. Set it aside to steep for a minimum of 30 minutes, or make it ahead up to overnight.Sukiyaki 1
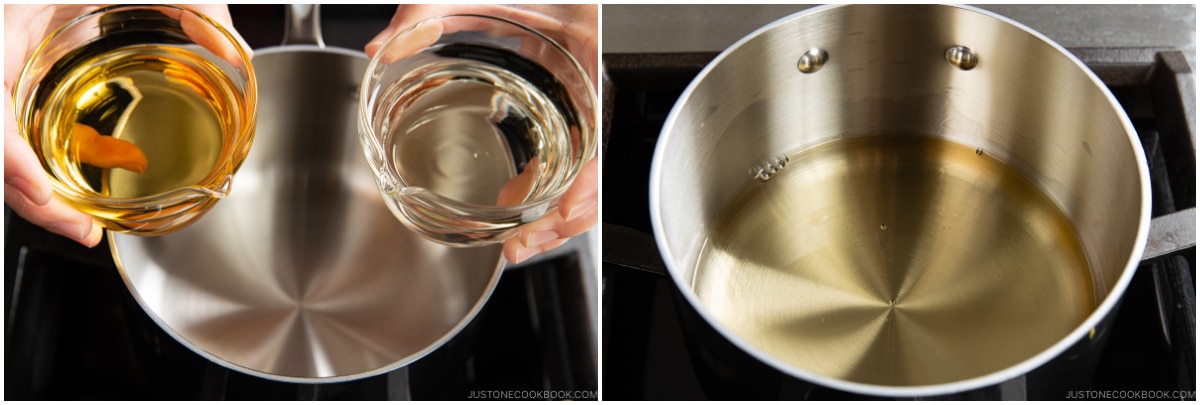
    • To make the sukiyaki sauce, combine ½ cup sake and ½ cup mirin in a small saucepan. Bring it to a boil and reduce the heat to simmer and let the alcohol evaporate for a minute or so.Sukiyaki 2
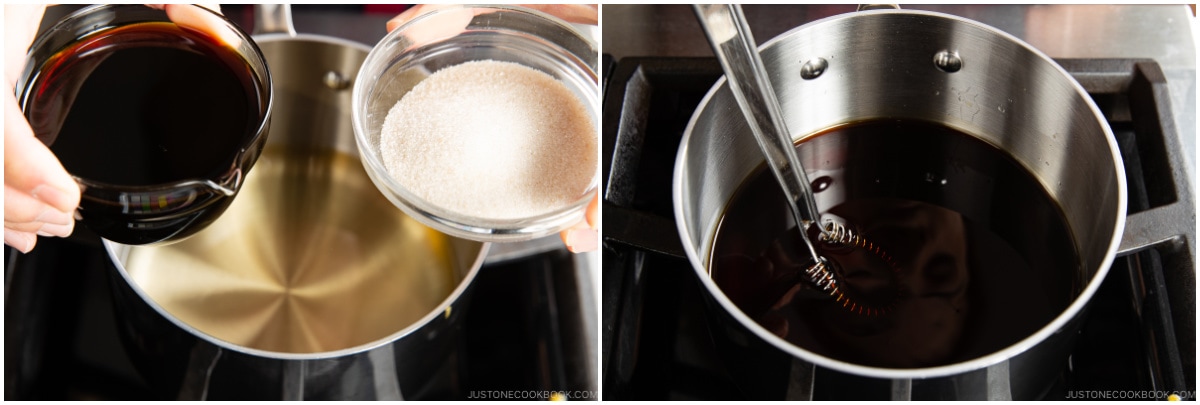
    • Add 3 Tbsp sugar and ½ cup soy sauce and mix together. Bring it back to a boil. Once the sugar is completely dissolved, turn off the heat and set it aside.Sukiyaki 3
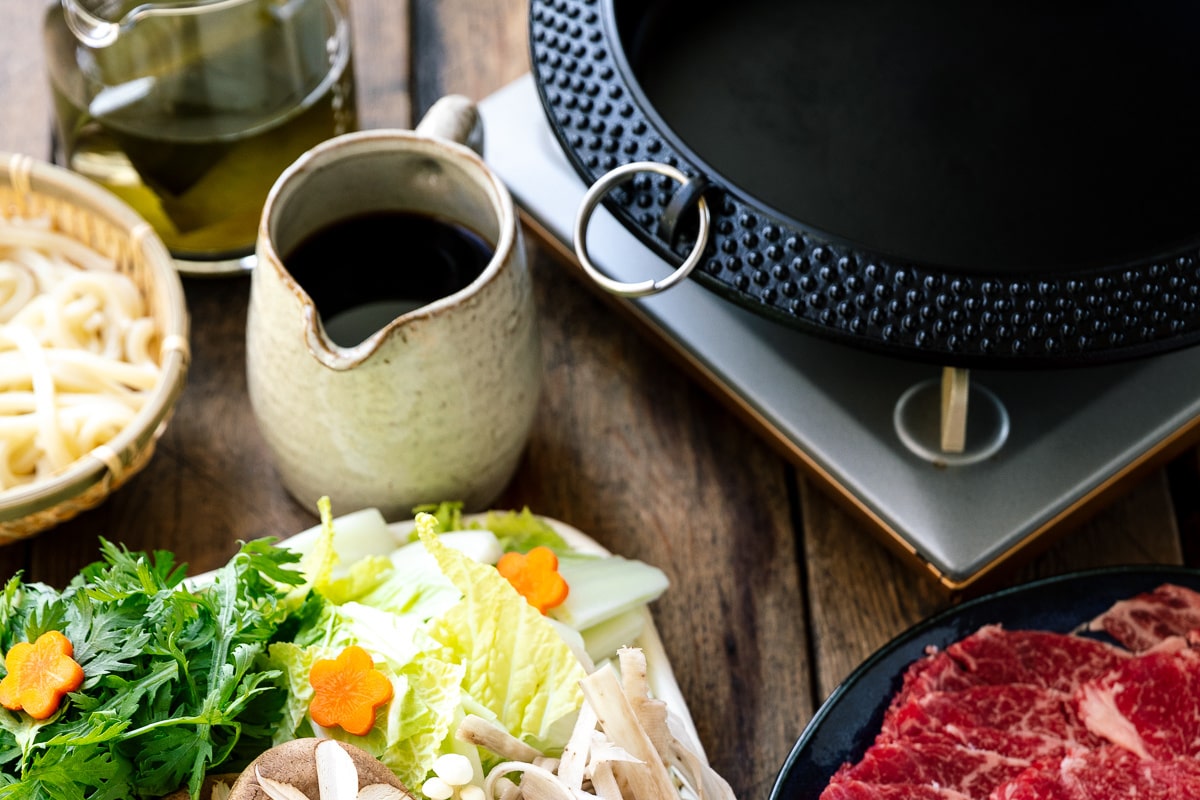
    • Transfer the sauce to a pitcher and bring both the dashi and the sauce to the table. Tip: You can make the sukiyaki sauce ahead and store it in an airtight container in the refrigerator for up to a month.Sukiyaki 4

    To Prepare the Sukiyaki Ingredients

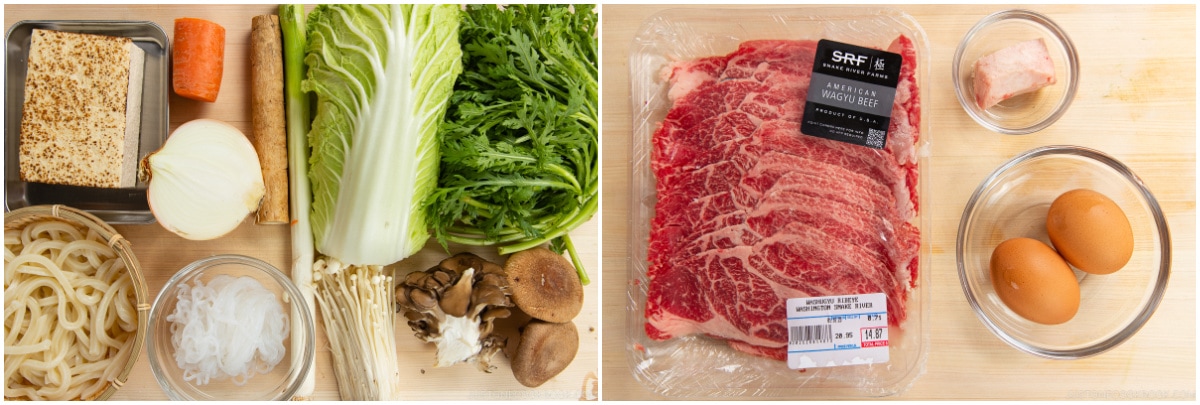
    • Gather all the sukiyaki ingredients. Feel free to customize the portions to suit your personal preference. Here, I used the entire package of grilled tofu (twice as much) since we love tofu.Sukiyaki Ingredients 2
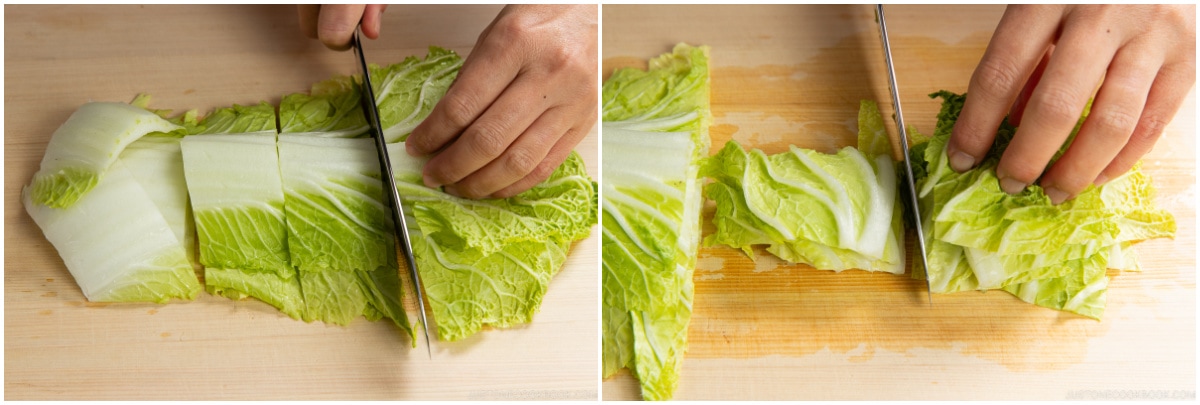
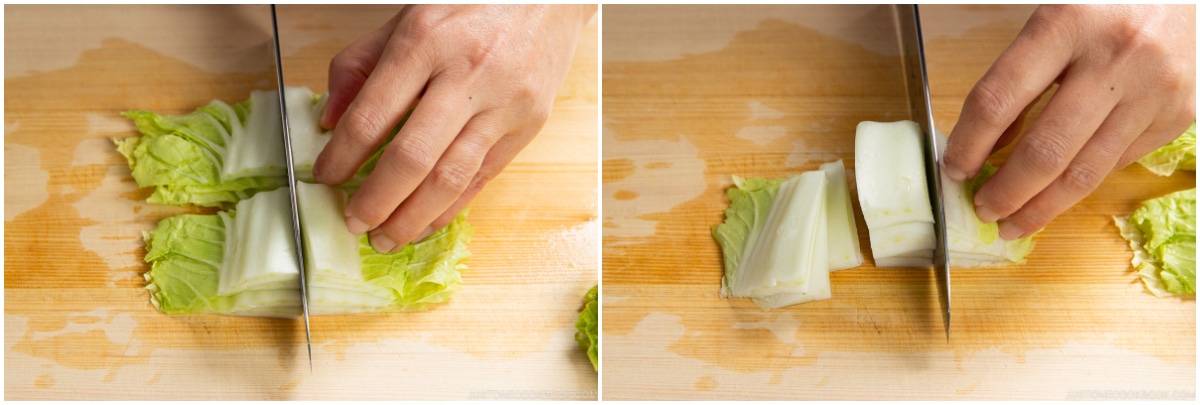
    • Cut 4 leaves napa cabbage into pieces 2 inches (5 cm) wide.Sukiyaki 5
    • Cut the pieces in half or thirds down along the thick white center of the leaves.Sukiyaki 6
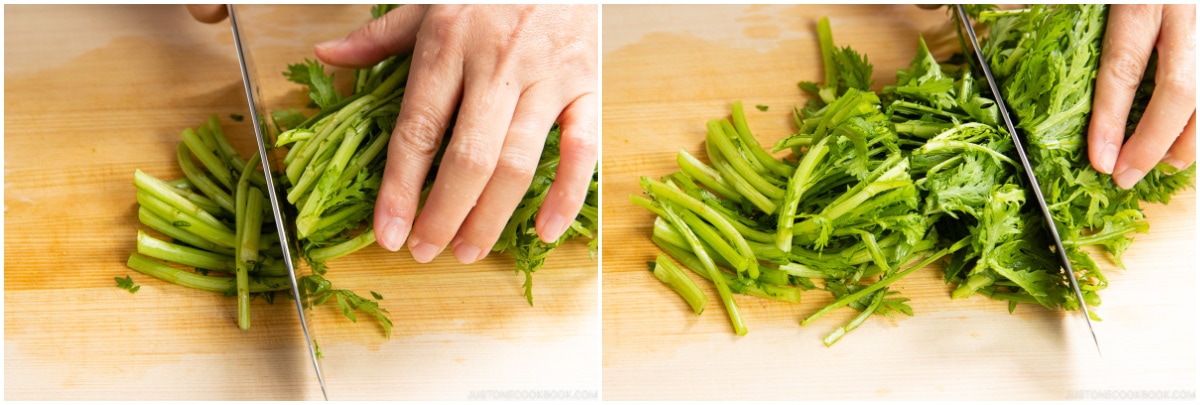
    • Cut ¼ bunch shungiku (chrysanthemum greens) 2 inches (5 cm) wide.Sukiyaki 7
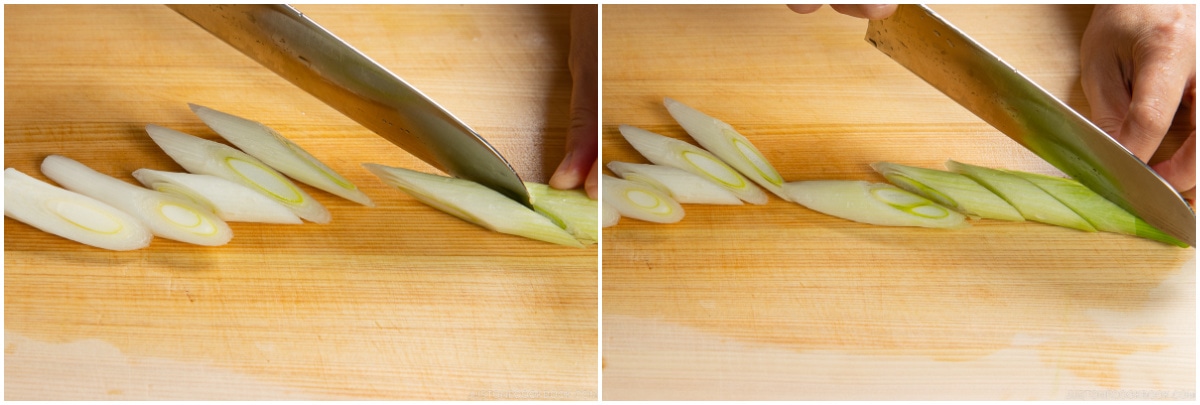
    • Slice the white part of 1 Tokyo negi (naga negi; long green onion) diagonally into ½-inch (1.3 cm) pieces.Sukiyaki 8
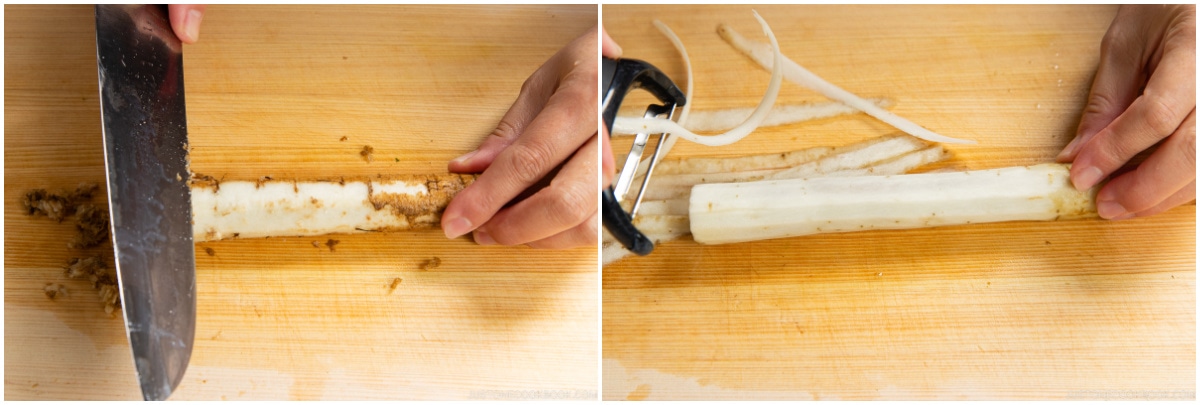
    • Scrape off the outer skin of 6 inches gobo (burdock root) with the back of a knife. The gobo‘s flavor is just under the skin, so don‘t use a vegetable peeler and peel that flavor away. Once you scrape off the skin, shave the gobo into superthin strips using a vegetable peeler.Sukiyaki 9
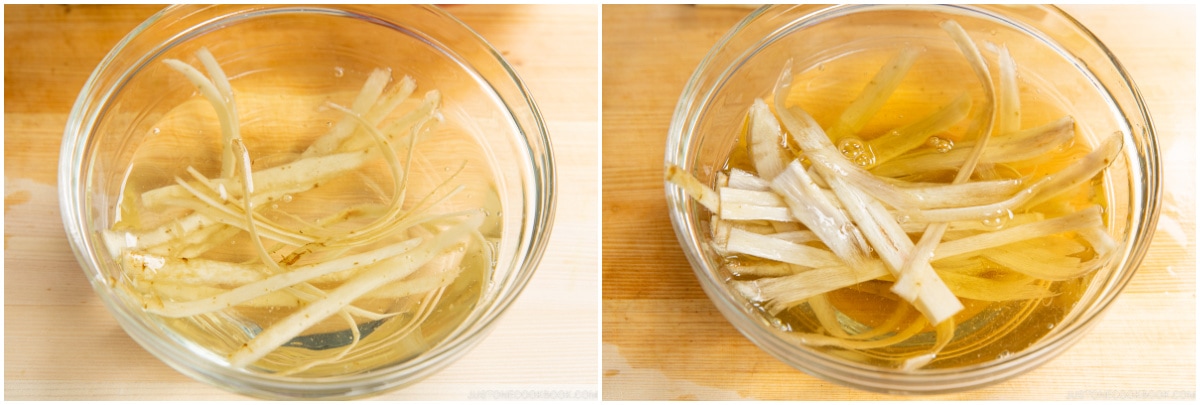
    • Soak the gobo strips in water for 5 minutes, changing the water once. Drain well.Sukiyaki 10
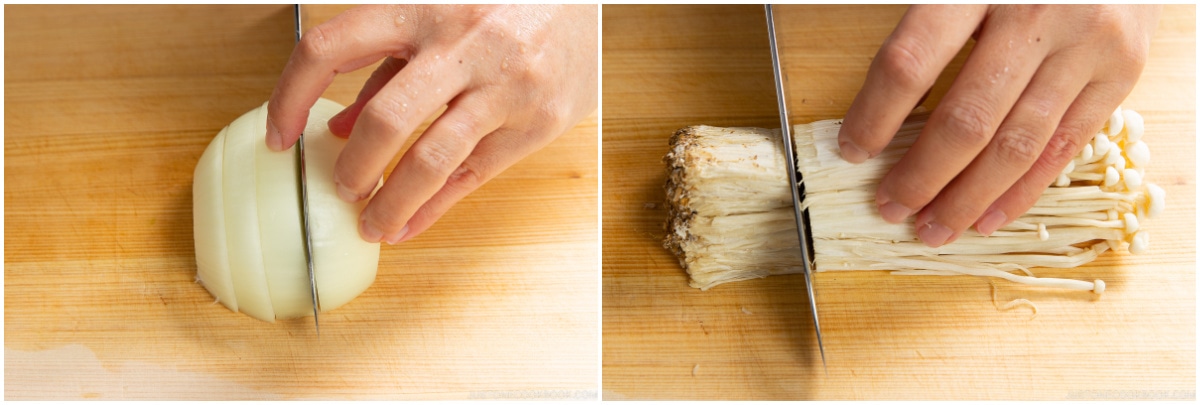
    • Cut ½ onion into ½-inch (1.3 cm) slices widthwise. Next, discard the bottom part of ½ package enoki mushrooms and tear it into smaller clusters.Sukiyaki 11
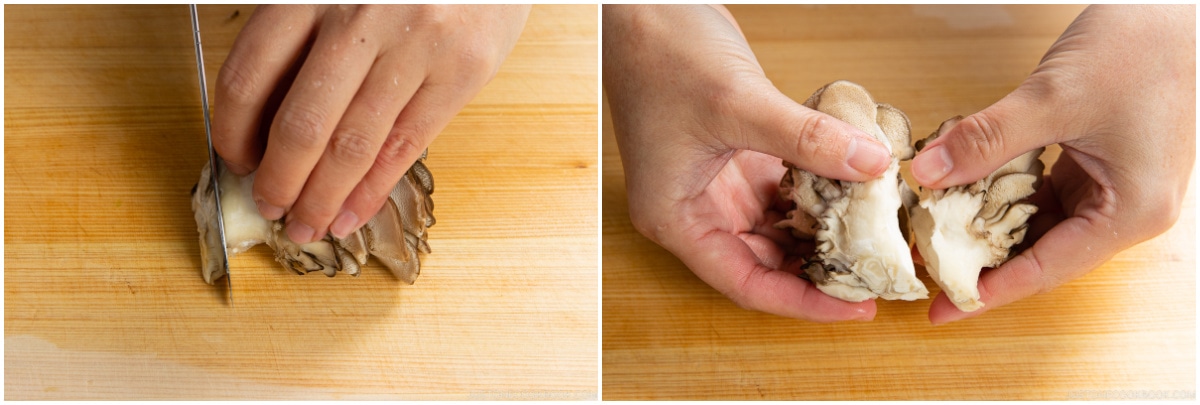
    • Cut off and discard the root ends of ½ package maitake mushrooms and separate the maitake bunch into 2 small clusters.Sukiyaki 12
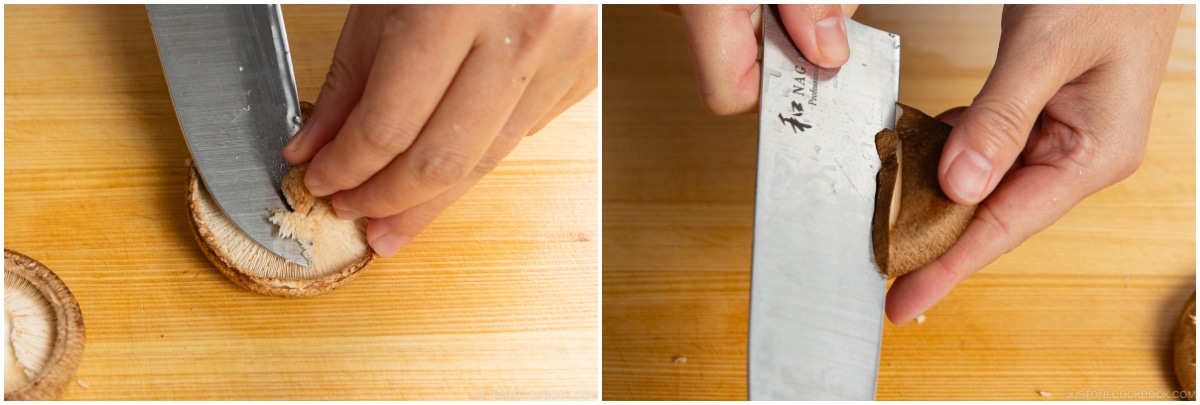
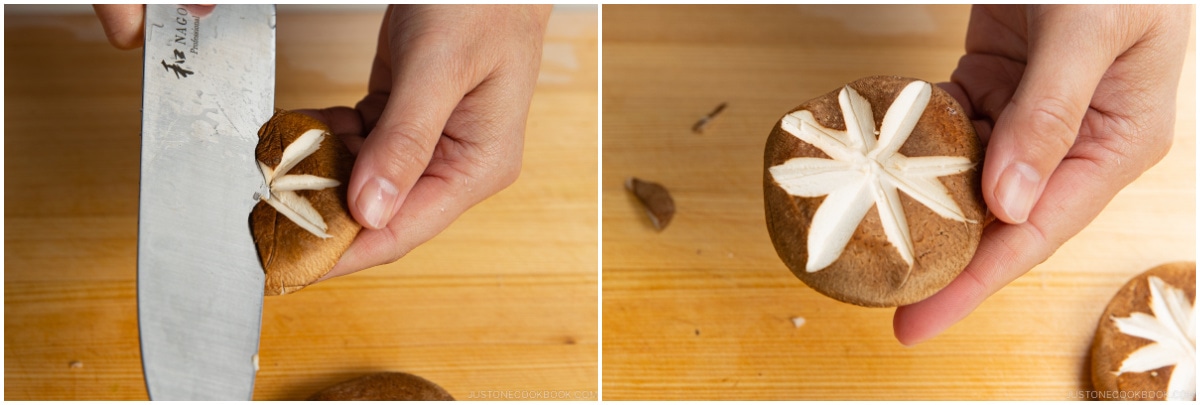
    • Cut off and discard the stems of 2 shiitake mushrooms. Optionally, you can cut a flower pattern on the shiitake mushroom caps: First, cut a sliver off the top of the mushroom cap by making 2 incisions in the shape of a “V”. Bevel these cuts toward each other by inserting the knife at an angle.Sukiyaki 13
    • Make a second cutout in the same manner to form an “X” with the first cutout. You can keep this “X” pattern or add one or two more cutouts. Watch my video on “shiitake hanagiri” that demonstrates this Japanese cutting technique.Sukiyaki 14
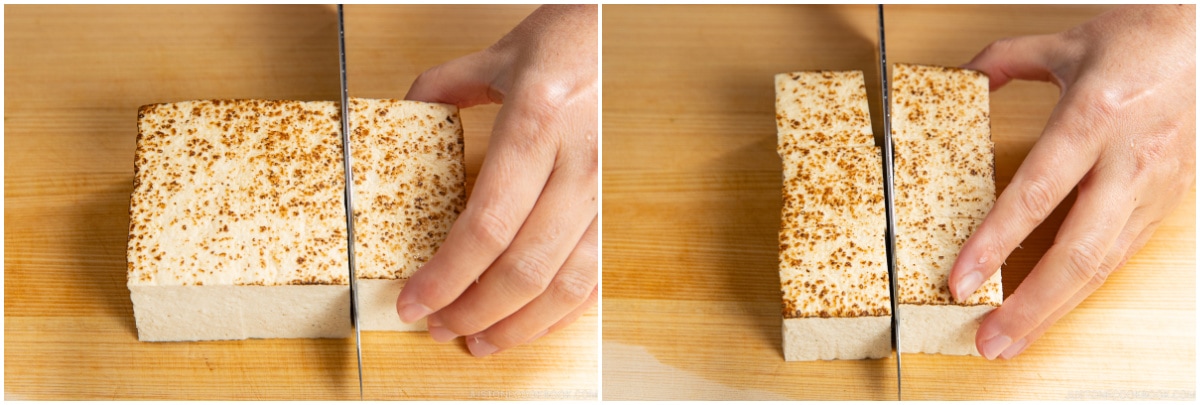
    • Cut ½ package broiled tofu (yaki dofu) into smaller pieces. We usually double the tofu portion and cut one block into 6–8 pieces.Sukiyaki 15
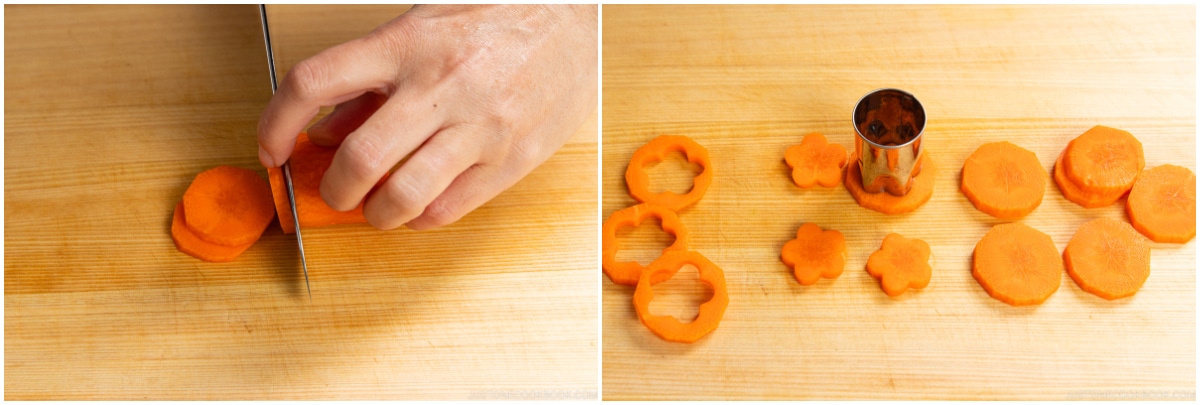
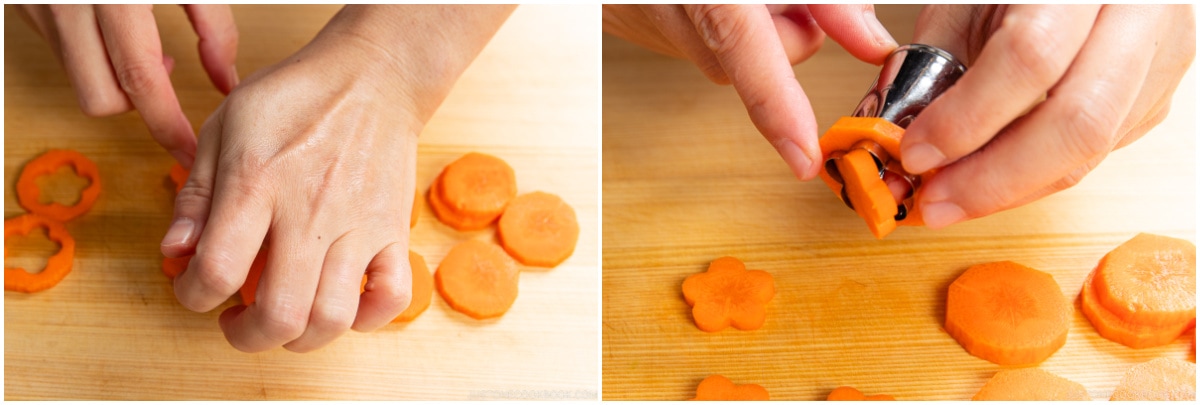
    • If you‘d like to make flower-shaped carrots (optional), first slice 1½ inches carrot into ¼-inch (6 mm) rounds.Sukiyaki 16
    • Here, I stamp the carrot coins with a vegetable cutter into a floral shape for decoration.Sukiyaki 17
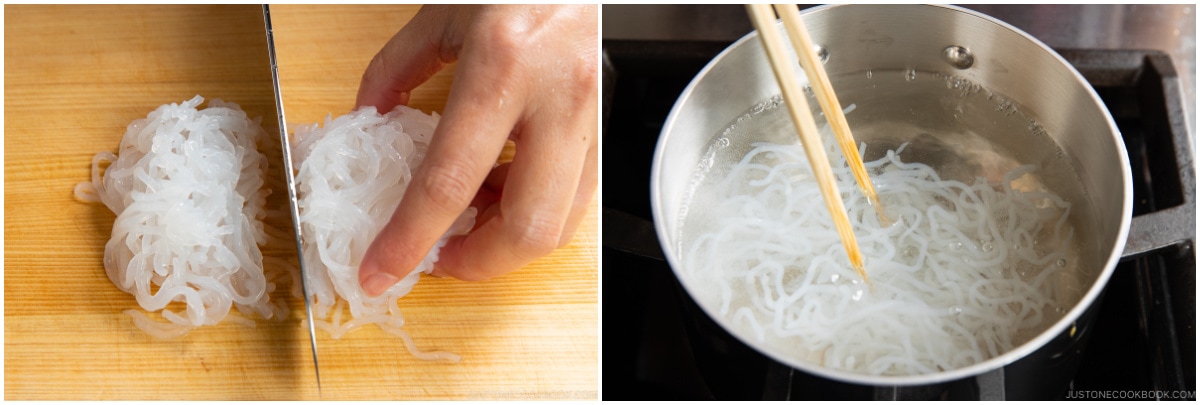
    • Rinse and drain ½ package shirataki noodles. Cut the noodles in half. Add the shirataki noodles to boiling water to remove any odor. Once the water is boiling again, cook for 2 minutes, drain, and set aside.Sukiyaki 18
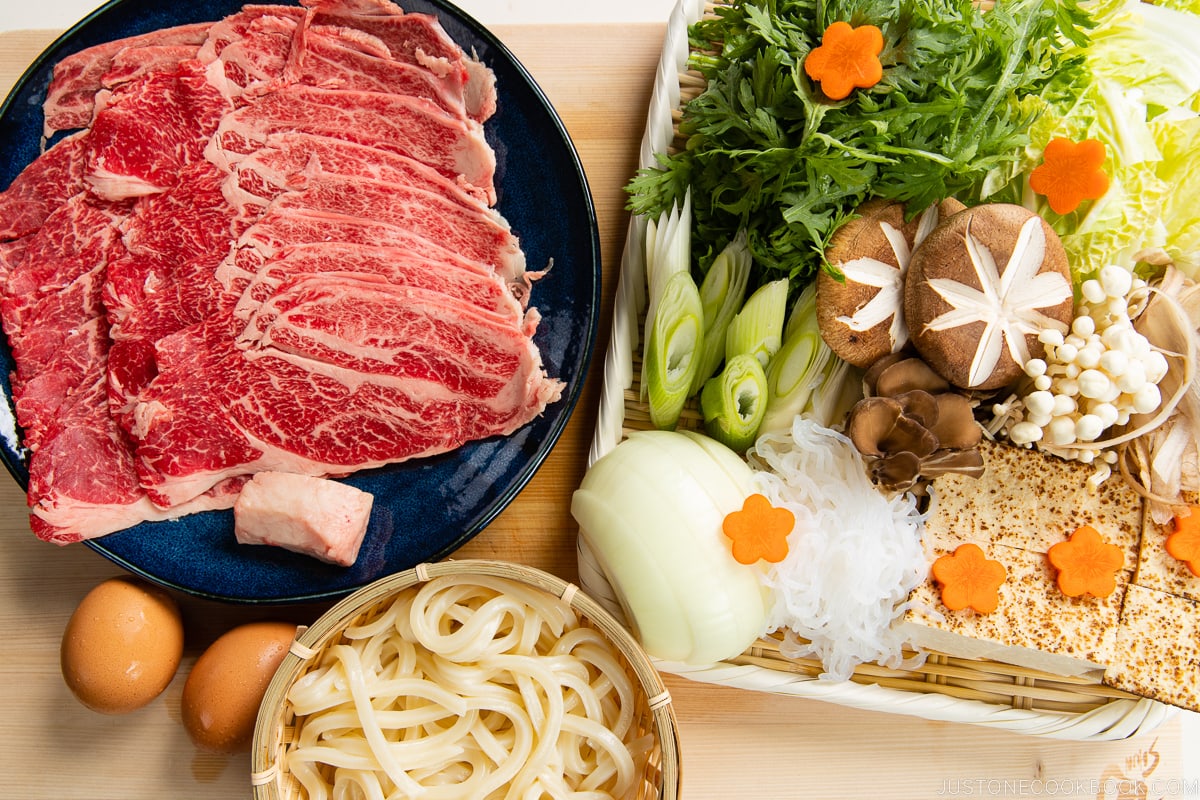
    • Place ½ lb thinly sliced beef (chuck or ribeye) and suet (if using) on a plate. Put all the ingredients on a big platter or bamboo tray for the dining table. I prepared my eggs sous vide (read the blog post) for dipping the cooked sukiyaki ingredients. I also cooked and drained 1 serving udon noodles and set them aside for the final course.Sukiyaki 19

    To Cook the Beef

    • Set a portable gas cooktop at the dining table. I use this cast-iron sukiyaki pot that I got from MTC Kitchen (use JOC10 for 10% off) and an Iwatani portable butane stove. Give each person a medium-sized bowl to put the cooked food from the pot.Sukiyaki Set Up
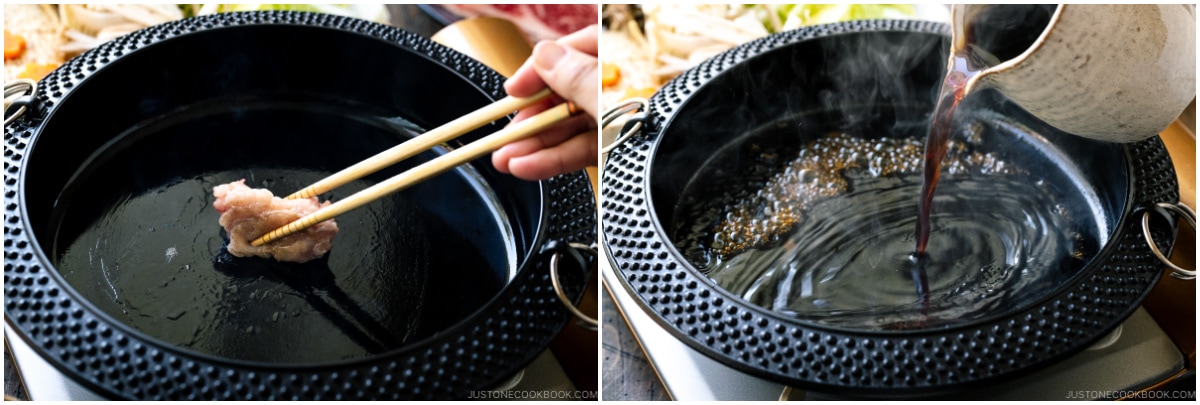
    • Heat the cast-iron sukiyaki pot (or any pot) on medium heat. When it’s hot, add 1 Tbsp neutral oil (or the suet). Then, pour in barely enough sukiyaki sauce to cover the bottom of the pot, about ⅛–¼ inch of sauce.Sukiyaki 20
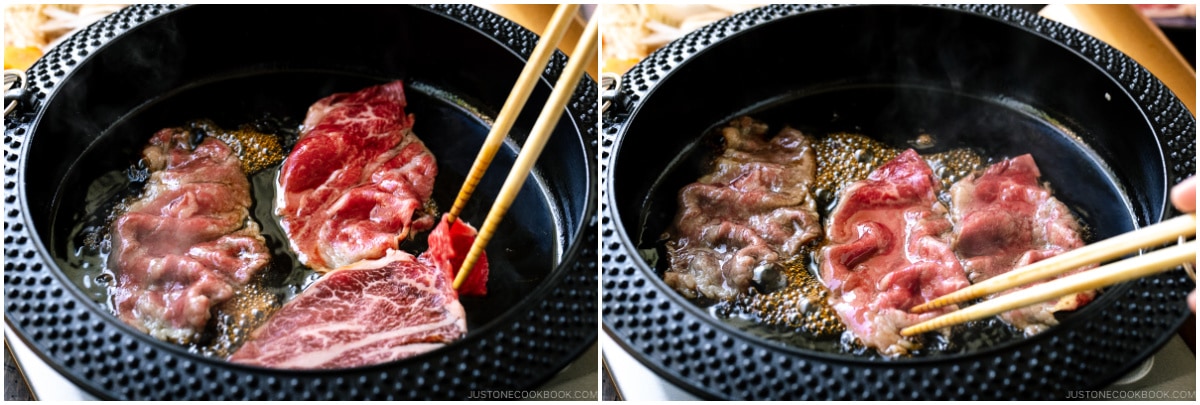
    • Place a few slices of well-marbled beef in the pot. When the bottom side of the meat is cooked, flip and cook the other side. Enjoy some (or all) of the sweet and caramelized meat now to consume this good-quality beef at its best. You can eat a few rounds of meat first or leave the meat in the pot and continue to the next step.Sukiyaki 21
  • Thanksgiving Delight: Mastering Okonomiyaki for a Flavorful Feast!

    This Thanksgiving, let’s add a dash of creativity to the table! Try our Okonomiyaki recipe—a Japanese savory pancake that’s a delightful departure from tradition. Packed with flavors and customizable toppings, it’s a tasty twist to make your Thanksgiving feast truly unforgettable. I stumbled upon this fantastic Okonomiyaki recipe on https://www.justonecookbook.com/, and I can’t wait to share it with everyone!

    PREP TIMES:

    Prep Time: 30 mins
    Cook Time: 30 mins
    Total Time: 1hr

    Ingredients

    For the Batter

    • 1 cup all-purpose flour (plain flour) (weigh your flour or use the “fluff and sprinkle“ method and level off)
    • ¼ tsp Diamond Crystal kosher salt
    • ¼ tsp sugar
    • ¼ tsp baking powder
    • 5.6 oz nagaimo/yamaimo (mountain yam) (2–3 inches, 5–8 cm)
    • ¾ cup dashi (Japanese soup stock) (use standard Awase Dashi, dashi packet or powder, or Vegan Dashi)
    • 4 large eggs (50 g each w/o shell)
    • ½ cup tenkasu/agedama (tempura scraps) (24 g)
    • ¼ cup pickled red ginger (beni shoga or kizami beni shoga)

    For the Other Ingredients

    • 1 head green cabbage (large; 1.6 lb, 740 g)
    • ½ lb sliced pork belly (or slice your own; you can substitute with shrimp, squid, or mushrooms)
    • neutral oil (for cooking the okonomiyaki)

    For the Quick Okonomiyaki Sauce

    • 1½ Tbsp sugar
    • 2 Tbsp oyster sauce
    • ¼ cup ketchup
    • 3½ Tbsp Worcestershire sauce

    Toppings of your choice

    • okonomiyaki sauce
    • Japanese Kewpie mayonnaise
    • katsuobushi (dried bonito flakes) (skip for vegetarian)
    • aonori (dried green laver seaweed)
    • green onions/scallions (chopped)
    • pickled red ginger (beni shoga or kizami beni shoga)

    Directions

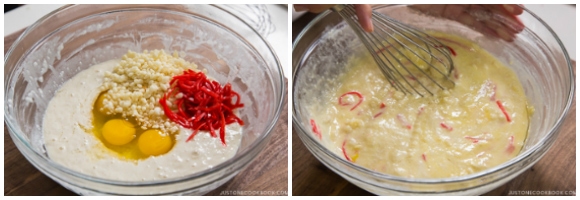
    • Take out the batter from the refrigerator. Add 4 large eggs (50 g each w/o shell)½ cup tenkasu/agedama (tempura scraps), and ¼ cup pickled red ginger (beni shoga or kizami beni shoga) to the bowl. Mix until combined.Okonomiyaki 8 NEW
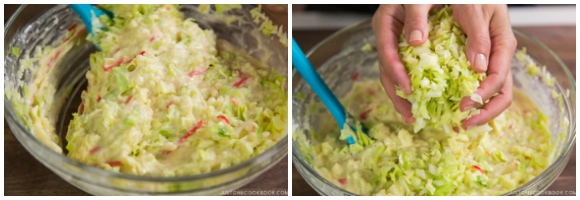
    • Add the minced cabbage to the batter, one-third of it at a time. Mix well before adding the rest.Okonomiyaki 9 NEW
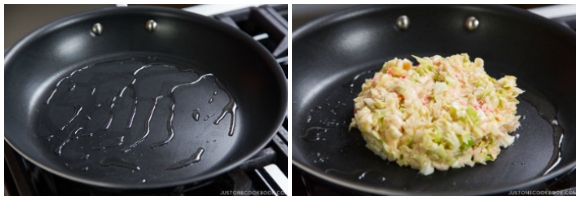
    • In a large pan, heat a bit of neutral oil on medium heat. When the frying pan is hot (400ºF or 200ºC), spread the batter in a circle on the pan. We like thicker okonomiyaki (the final thickness is ¾ inches or 2 cm). If you’re new to making okonomiyaki, make it smaller and thinner so it’s easier to flip.Okonomiyaki 10 NEW
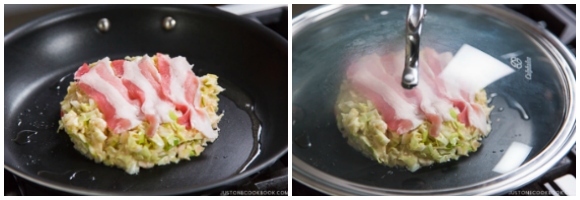
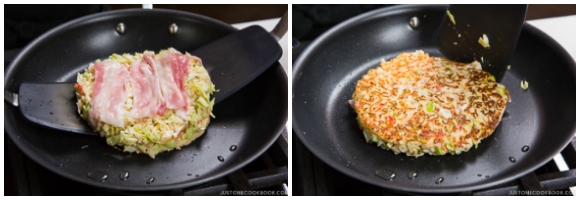
    • Place 2–3 slices of pork belly on top of the okonomiyaki and cook covered for 5 minutes.Okonomiyaki 11 NEW
    • When the bottom side is nicely browned, flip it over.Okonomiyaki 13 NEW
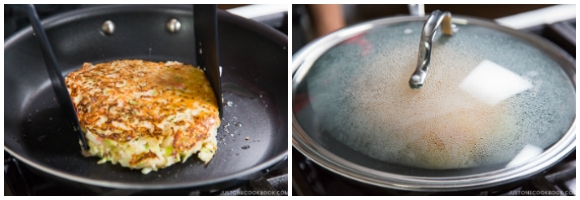
    • Gently press the okonomiyaki to fix its shape and keep it together. Cover and cook for another 5 minutes.
      Okonomiyaki 14 NEW
    • Flip it over one last time and cook uncovered for 2 minutes. If you’re going to cook the next batch, transfer the cooked okonomiyaki to a plate.
  • Thanksgiving Rolls

    The simple yet delicious Thanksgiving roll is a must-have that frequently steals the show at the dinner table as Thanksgiving draws near. These fluffy treats, which are best enjoyed warm and drenched in butter, are essential to making the entire meal experience more enjoyable on this joyous occasion. Thanksgiving rolls represent coziness and unity in addition to their delicious flavor, capturing the essence of giving and receiving that characterizes the occasion. These baked treats, whether they are soft and fluffy crescent rolls, traditional dinner rolls, or enhanced with herbs and spices, have a special way of uniting family and friends as they rip, share, and relish every delicious bite.

    The anticipation that grows as the delicious aroma fills the kitchen, indicating that the feast is almost ready, is what makes Thanksgiving rolls really unique. A combination of talent and tradition go into making the ideal roll, and many families pass down their treasured recipes from one generation to the next. Thanksgiving rolls, whether cooked from scratch or purchased from a store, are a global representation of the coziness and happiness that come with enjoying a hearty feast with loved ones. As we assemble around the table this Thanksgiving, let’s take a moment to honor the unsung hero of the meal—the Thanksgiving roll—which gives the holiday feast a magical touch and turns a straightforward dinner into a touching celebration of unity and appreciation.

    Ingredients:

    • 1 cup. whole milk
    • 2 1/4 tsp. dry active yeast (from a 1 1/4-oz. packet)
    • 2 tbsp. granulated sugar, divided
    • 1 large egg, room temperature
    • 1 1/2 tsp. kosher salt
    • 6 tbsp. unsalted butter, melted, divided
    • 3 1/4 c. (390 g.) all-purpose or bread flour, divided

    Instructions:

    1. Microwave milk in a small heatproof basin in 30-second increments until it reaches 110° on an instant-read thermometer or is warm to the touch. Pour into a stand mixer’s big bowl that has the dough hook attached to it. Whisk together the yeast and 1 tablespoon of granulated sugar. Wait for foamy, about five minutes.
    2. Add the remaining 1 tablespoon of granulated sugar, 4 tablespoons of butter, egg, and salt. Beat for about 30 seconds at a medium speed, or until well blended. After adding one cup of flour, beat for 30 seconds on medium speed, or until mixed. Using a rubber spatula, scrape down the bowl’s sides and add the remaining 2 1/4 cups flour. Beat for approximately a minute on medium speed, or until dough comes together and pulls away from bowl sides. Beat for a further three minutes or until the dough becomes smoother and more elastic, scraping down the sides as needed.
    3. Apply a thin layer of oil to a big bowl. Dough is scraped into a bowl and tossed to coat with oil. Use a fresh kitchen towel or plastic wrap to cover the bowl. Let rise for about an hour or until doubled in size in a warm location.
    4. A 13″ by 9″ baking pan should be greased with cooking spray or oil. Knead the rising dough. Cut into 12 equal parts, each weighing around 70 grams. Form each component into round, smooth balls and place in the pan that has been ready. Use a fresh kitchen towel or plastic wrap to cover. Allow to rise for about an hour in a warm location until puffed.
    5. Set an oven rack in the lowest third and preheat the oven to 350°. Bake for 25 to 30 minutes, turning the rolls halfway through and covering them with foil if they brown too soon.
    6. Rolls should be brushed with the last two tablespoons of butter and dusted with sea salt.

    Nutrition Facts:

    Calories 56

    Total Fat 1.59g,

    Saturated Fat 0.904g

    Trans Fat 0g

    Polyunsaturated Fat 0.112g

    Monounsaturated Fat 0.413g

    Cholesterol 10mg

    Sodium 106mg

    Total Carbohydrate 8.61g

    Dietary Fiber 0.3g

    Sugars 0.37g

    Protein 1.62g

    Calcium 17mg

    Iron 0.53mg

    Potassium 28mg

    Vitamin A 21mcg

    Vitamin C 0.1mg