Category: Cultural Dishes

  • Quick and Easy Kake Udon Recipe: Japanese Comfort in Minutes

    Enjoy the soothing flavors of Japan with our quick and easy Kake Udon recipe. This simple dish combines soft udon noodles with a flavorful soy-based broth, making it the perfect comfort food that’s ready in minutes. Customize it with your favorite toppings for a delicious and satisfying meal.

    Ingredients:

    For the Udon Soup:

    • 2 packs of udon noodles (about 8 ounces)
    • 4 cups of dashi stock (you can use store-bought or make your own by dissolving dashi granules in hot water)
    • 1/4 cup soy sauce
    • 2 tablespoons mirin (sweet rice wine)
    • 1 tablespoon sake (Japanese rice wine)
    • 1 tablespoon sugar
    • Salt to taste

    Toppings:

    • Sliced green onions
    • Kamaboko (fish cake), sliced
    • Tempura flakes (tenkasu)
    • Nori (seaweed) strips
    • Soft-boiled or poached eggs
    • Shichimi togarashi (Japanese seven-spice blend)
    • Sliced mushrooms
    • Spinach or other leafy greens
    • Menma (fermented bamboo shoots)
    • Grilled chicken or pork slices

    Instructions:

    1. Prepare the Udon Noodles:
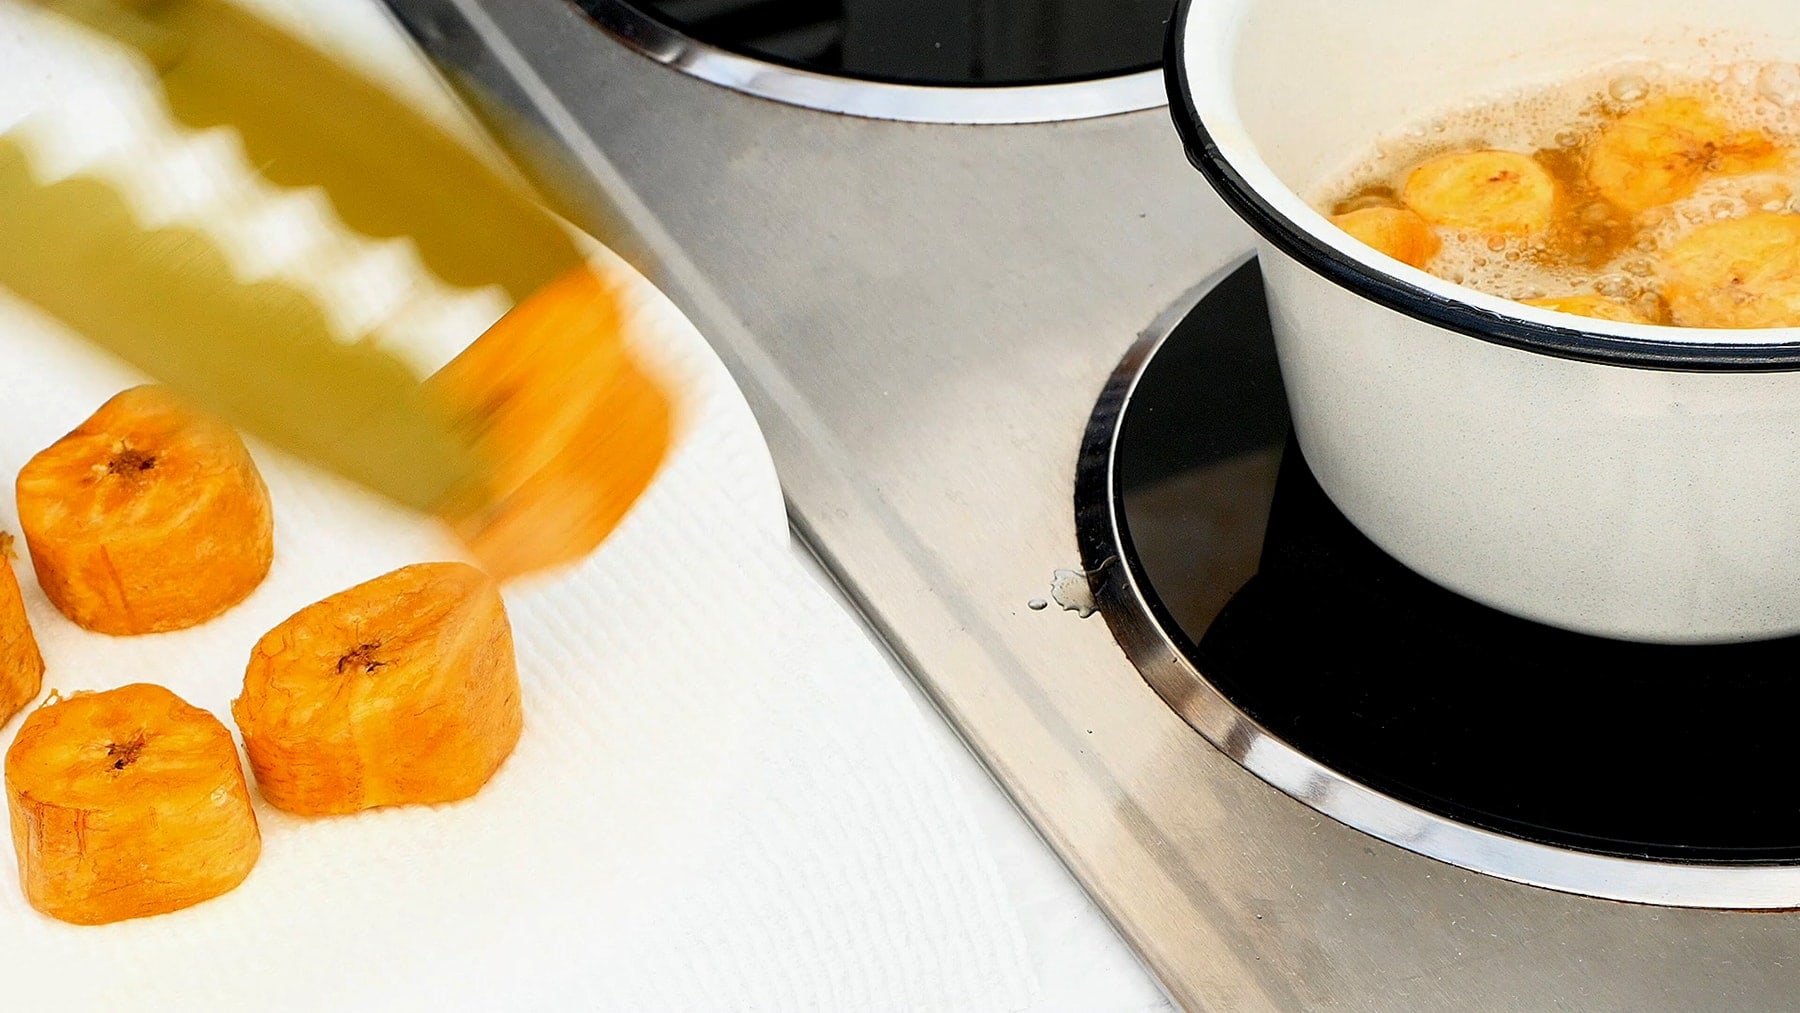
      • Bring a large pot of water to a boil. Cook the udon noodles according to the package instructions (usually around 8-10 minutes) until they are soft but still have some chewiness. Be careful not to overcook them. Stir occasionally to prevent sticking.
      • Drain the cooked udon noodles and rinse them under cold water to remove excess starch. This will prevent them from becoming too sticky.
    2. Prepare the Udon Soup:
      • In a separate pot, combine the dashi stock, soy sauce, mirin, sake, and sugar. Bring the mixture to a simmer over medium heat. Taste the soup and adjust the seasoning with salt if necessary. Remember that the udon noodles will absorb some of the soup’s flavor, so it should be slightly on the salty side.
    3. Assemble the Udon Soup:
      • Divide the cooked udon noodles between two serving bowls.
    4. Add the Hot Soup:
      • Pour the hot udon soup over the udon noodles in each bowl.
    5. Add Toppings:
      • Customize your udon by adding your favorite toppings. Common choices include sliced green onions, kamaboko, tempura flakes, nori strips, and a soft-boiled or poached egg. You can add any other toppings you like as well.
    6. Serve:
      • Serve your homemade udon hot and garnish it with shichimi togarashi (Japanese seven-spice blend) if you like some heat. Enjoy your delicious bowl of Kake Udon!

    With our “Quick and Easy Kake Udon Recipe,” you can bring the authentic taste of Japan to your kitchen without any fuss. Whether you’re a seasoned cook or a beginner, this delightful and comforting dish is a breeze to prepare, providing a warm and satisfying meal that’s perfect for any day. So, get ready to savor the flavors of Japan in no time with this convenient recipe.

  • Hot and Sour Soup (酸辣湯)

    A delightful and soothing dish, hot and sour soup is one of the many culinary gems of Chinese cuisine, which is an intriguing tapestry of tastes. With its mouthwatering combination of tart and spicy flavors, this famous soup has gained popularity in China and beyond. We’ll explore the many ingredients, lengthy history, and skill involved in making the ideal bowl of Chinese hot and sour soup in this blog.

    The Mandarin term “Suan La Tang” (hot and sour soup) has a rich and lengthy history spanning several centuries. Its precise origins are unknown, but the Sichuan area of China—known for its strong, spicy flavors—is thought to be the place of origin. The soup has changed over time, adjusting to local preferences and turning into a mainstay in various Chinese cooking customs.

    Ingredients:

    For the Soup Base:

    • 4 cups chicken or vegetable broth
    • 1/4 cup soy sauce
    • 1/4 cup rice vinegar
    • 1 teaspoon sesame oil
    • 1 teaspoon sugar
    • 1/2 teaspoon white pepper (adjust to taste)
    • 1/2 teaspoon ground ginger

    Additional Soup Ingredients:

    • 1/2 cup tofu, cubed
    • 1/2 cup shiitake mushrooms, sliced
    • 1/4 cup bamboo shoots, julienned
    • 1/4 cup wood ear mushrooms, rehydrated and sliced
    • 1/4 cup carrot, julienned
    • 2 green onions, thinly sliced
    • 1 egg, beaten
    • 2 tablespoons cornstarch mixed with 3 tablespoons water (for thickening)

    Optional Additions:

    • Cooked chicken strips
    • Cooked shrimp
    • Sliced pork

    Instructions:

    1. Prepare Ingredients:
      • Cut tofu into small cubes.
      • Slice shiitake mushrooms and bamboo shoots.
      • Rehydrate and slice wood ear mushrooms.
      • Julienne carrot and chop green onions.
    2. Make the Soup Base:
      • In a pot, combine chicken or vegetable broth, soy sauce, rice vinegar, sesame oil, sugar, white pepper, and ground ginger.
      • Bring the mixture to a simmer over medium heat.
    3. Add Vegetables and Tofu:
      • Add tofu, shiitake mushrooms, bamboo shoots, wood ear mushrooms, and carrots to the pot.
      • Simmer until the vegetables are tender, about 5-7 minutes.
    4. Thicken the Soup:
      • In a small bowl, mix cornstarch with water to create a slurry.
      • Slowly pour the slurry into the simmering soup while stirring constantly.
      • Continue to simmer until the soup thickens.
    5. Add Beaten Egg:
      • While stirring the soup in a circular motion, slowly pour in the beaten egg. The egg will cook and form silky strands in the soup.
    6. Adjust Seasoning:
      • Taste the soup and adjust the seasoning if needed. You can add more soy sauce, vinegar, or white pepper according to your preference.
    7. Serve:
      • Ladle the hot and sour soup into bowls.
      • Garnish with sliced green onions.

    Enjoy your homemade Chinese Hot and Sour Soup! Feel free to customize the recipe by adding your favorite protein or adjusting the spice level.

    Nutrition Facts:

    (per one cup/serving):

    • Calories: Around 80-120 calories
    • Protein: 4-8 grams
    • Fat: 2-5 grams
      • Saturated Fat: 0-1 gram
      • Trans Fat: 0 grams
    • Carbohydrates: 10-15 grams
      • Dietary Fiber: 1-2 grams
      • Sugars: 1-3 grams
    • Cholesterol: 0-20 milligrams
    • Sodium: 800-1200 milligrams
    • Vitamin A: 500-1000 IU
    • Vitamin C: 10-20 milligrams
    • Calcium: 20-40 milligrams
    • Iron: 1-2 milligrams
  • Chinese Tomato Egg Stir-fry, 番茄炒鸡蛋

    Chinese food is a complex tapestry of flavors, and the Tomato Egg Stir-Fry is a dish that perfectly demonstrates the skill of blending flavors. This recipe is a culinary masterwork that combines the deep, savory richness of eggs with the sweetness of ripe tomatoes to create a symphony of flavors that dance on your tongue. Come along on a gastronomic adventure as we examine the origins, components, and preparation techniques of this tasty and cozy dish.

    The Mandarin term for Tomato Egg Stir-Fry is “西红柿炒鸡蛋” (Xī hóng shì chƎo jī dàn). It is a traditional Chinese home-cooked meal with a rich culinary history. Despite being a relatively new addition to Chinese food—they were first used in the 19th century—tomatoes’ incorporation into classic recipes like this stir-fry shows how flexible and inventive Chinese cooking can be.

    This dish is commonly connected to warmth and comfort in China, bringing back memories of the easy yet filling meals that moms and grandmothers used to make. It is a favorite among Chinese communities worldwide due to its popularity that transcends China’s boundaries.

    Ingredients:

    • Ripe Tomatoes
    • Eggs
    • Green Onions
    • Seasoning requires salt and pepper.
    • Umami and depth are added by soy sauce.
    • Sugar
    • Sesame oil
    • Cooking Oil

    Instructions:

    1. Chopped tomatoes: Chop the tomatoes into pieces of a moderate size.
    2. Topple the Eggs: In a bowl, whisk the eggs.
    3. Finely dice the green onions. Chop the green onions finely.
    4. Heat the Pan: Fill a wok or frying pan with cooking oil and let it get hot.
    5. Pour the whisked eggs into the pan and scramble them until they are barely set. Take out and place aside.
    6. Cook the Tomatoes: Add a little more oil to the same pan and stir-fry the tomatoes until their juices come out.
    7. Mix Eggs and Tomatoes: Return the scrambled eggs to the pan after the tomatoes have become a little softer. Blend thoroughly.
    8. Add sugar, soy sauce, salt, and pepper for seasoning. Taste and adjust the seasonings.
    9. Add green onions last. Include the chopped
    10. Serve and Enjoy!

    Nutrition Facts:

    • Calories: Around 287 calories
    • Protein: Around 13g
    • Fat: Around 24g
    • Carbohydrates: Around 7g
    • Fiber: Around 1g
    • Sugars: Around 4g
  • Enjoy a Delicious Dominican Sancocho

    Dominican Sancocho, a soul-warming treasure from the Caribbean, is not just a stew; it’s a celebration of flavors, traditions, and the joy of communal dining. Imagine a fragrant pot bubbling with succulent meats – beef, chicken, and sometimes pork – infused with aromatic spices. This hearty concoction is then lovingly simmered alongside a colorful medley of yams, plantains, and vegetables until they meld into a rich, savory perfection. The air is filled with the enticing aroma of coriander, oregano, and garlic, a prelude to the feast that follows. Each spoonful is an invitation to a world of culinary bliss, where tender meats, softened vegetables, and aromatic broth combine in a symphony of tastes. Served hot, with a side of rice and perhaps a sprinkle of fresh cilantro, Dominican Sancocho not only nourishes the body but also warms the heart, creating moments of happiness and togetherness around the dinner table.

    Prep-Time

    PREP TIME: 15minutes mins

    COOK TIME: 1hour hr 45minutes mins

    TOTAL TIME: 2hours hrs

    COURSE: Main Dish, Soup, Stew

    CUISINE: Caribbean, Dominican

    SERVINGS: 8 servings

    CALORIES: 505 kcal

    Ingredients:

    • 1 lb pork loin end chops
    • 1 ½ lbs pork stew cubes
    • ½ lb smoked pork neck bones
    • 1 ½ teaspoon adobo seasoning, separated
    • ½ teaspoon ground black pepper
    • 1 ½ teaspoon dried oregano, separated
    • 2 tablespoons homemade sofrito
    • 1 tablespoon vegetable oil
    • 2 ears corn, cut into 1 inch pieces
    • 1 lb kabocha squash, peeled and seeds removed
    • 2 green plantains, peeled and cut into 1 inch pieces
    • 1 lb white yautia, peeled and cut into 1 inch pieces
    • 1 lb yuca, peeled and cut into 2 inch pieces, each piece cut in half lengthwise
    • 1 large carrot, peeled and sliced
    • 2 cubes chicken bouillon
    • 1 teaspoon whole allspice, malagueta
    • 4 whole leaves of recao culantro, cilantro ancho
    • 2 tablespoon cilantro in its stem
    • 5 sprigs of fresh thyme
    • ½ teaspoon red pepper flakes
    • Salt and pepper to taste
    • 1 tablespoon lime juice, freshly squeezed

    Instructions

    • Trim the excess fat of the meat and rinse well with lemon juice or vinegar.
    • To season the meat, add 1 teaspoon dry adobo, ½ teaspoon ground black pepper, 1 teaspoon oregano and sofrito. Mix it all together to coat the meat well.
    • In a 6 qts pot or caldero, heat up oil over medium high heat. Add the meat to the pot, and sear until brown all around. Cover the pot with a lid and lower the heat to medium. Let the meat cook until tender, about 30 – 40 minutes. Be sure to add water as needed throughout so that the meat doesn’t burn. Remove the meat from the pot and set it aside for later.
    • While the meat cooks, peel and cut the vegetables into 1-inch pieces, except for the squash, which you want to peel and cut into two large pieces.
    • Add all the vegetables to the pot and add water until you’ve filled ¾ of the pot. Bring to a boil. Do not overfill the pot because you will be adding in the meat later.
    • When the water begins to boil, add the chicken bouillon and allspice or malagueta. Let it cook for about 15 – 20 minutes.
    • When the squash is tender, remove it from the pot and blend it with ½ cup of liquid from the pot and ½ cup of cool water until the mixture is smooth. Then, pour it back into the pot.
    • Using cooking twine, tie together tightly cilantro, culantro (cilantro ancho), and thyme and add it to the pot. Let it simmer on medium heat for about 20 more minutes.
    • Stir in ½ teaspoon of adobo, ½ teaspoon of oregano, red pepper flakes, salt and pepper to taste.
    • Add the meat back into the pot and let it all simmer until the vegetables are tender, about 10 – 20 minutes.
    • With a colander, remove the herbs bundle we added earlier and the malagueta.
    • Stir in freshly squeezed lime juice before serving.
    • Serve warm with white rice and avocado.
  • Make a delicious mofongo Dominicano Dish, and enjoy it.

    Mofongo, a beloved Dominican delight, captures the essence of Caribbean happiness on a plate. Imagine perfectly fried plantains, mashed with garlic and spices, creating a harmonious blend of sweetness and savoriness. Every bite is a burst of flavor, a culinary journey through Dominican traditions. Paired with meats or seafood, it embodies the heartwarming spirit of Dominican cuisine, making every meal a joyful celebration.

    PREP-TIME

    PREP TIME: 15minutes mins

    COOK TIME: 35minutes mins

    TOTAL TIME: 50minutes mins

    SERVINGS: 4 servings

    CALORIES: 659 kcal

    Ingredients:

    For the beef broth

    For the Puerto Rican mofongo

    For the old-style Dominican mofongo

    Directions:

    In a large saucepan heat the olive oil over medium heat. Brown the beef being careful that it does not burn. Add the garlic and onion and stir. Pour in 4 cups of water, and add cilantrocilantro ancho, and oregano.Boil for an hour over low heat, topping off the water every once in a while to maintain the same level.Season with salt to taste. Sieve and remove the solids.

    1. Fry the plantains

    • Begin by heating some oil in a small pot or saucepan over medium heat. subsequently, fry the plantain slices until they turn golden brown all over, a process that generally takes 3-5 minutes. Remove from the oil and place on a paper towel.

    2. Crush plantains

    • To begin, use a pilón (large mortar and pestle) or a potato masher to crush the garlic and salt together. Next, incorporate the plantains and mash them. Now, add the pork cracklings and continue mashing and crushing to combine them with the plantains. Depending on the size of your pilón, you might need to divide the ingredients and work in six batches to ensure they fit. Afterwords, the mixture will develop a dense consistency and roughly form a ball.

    3. Serve

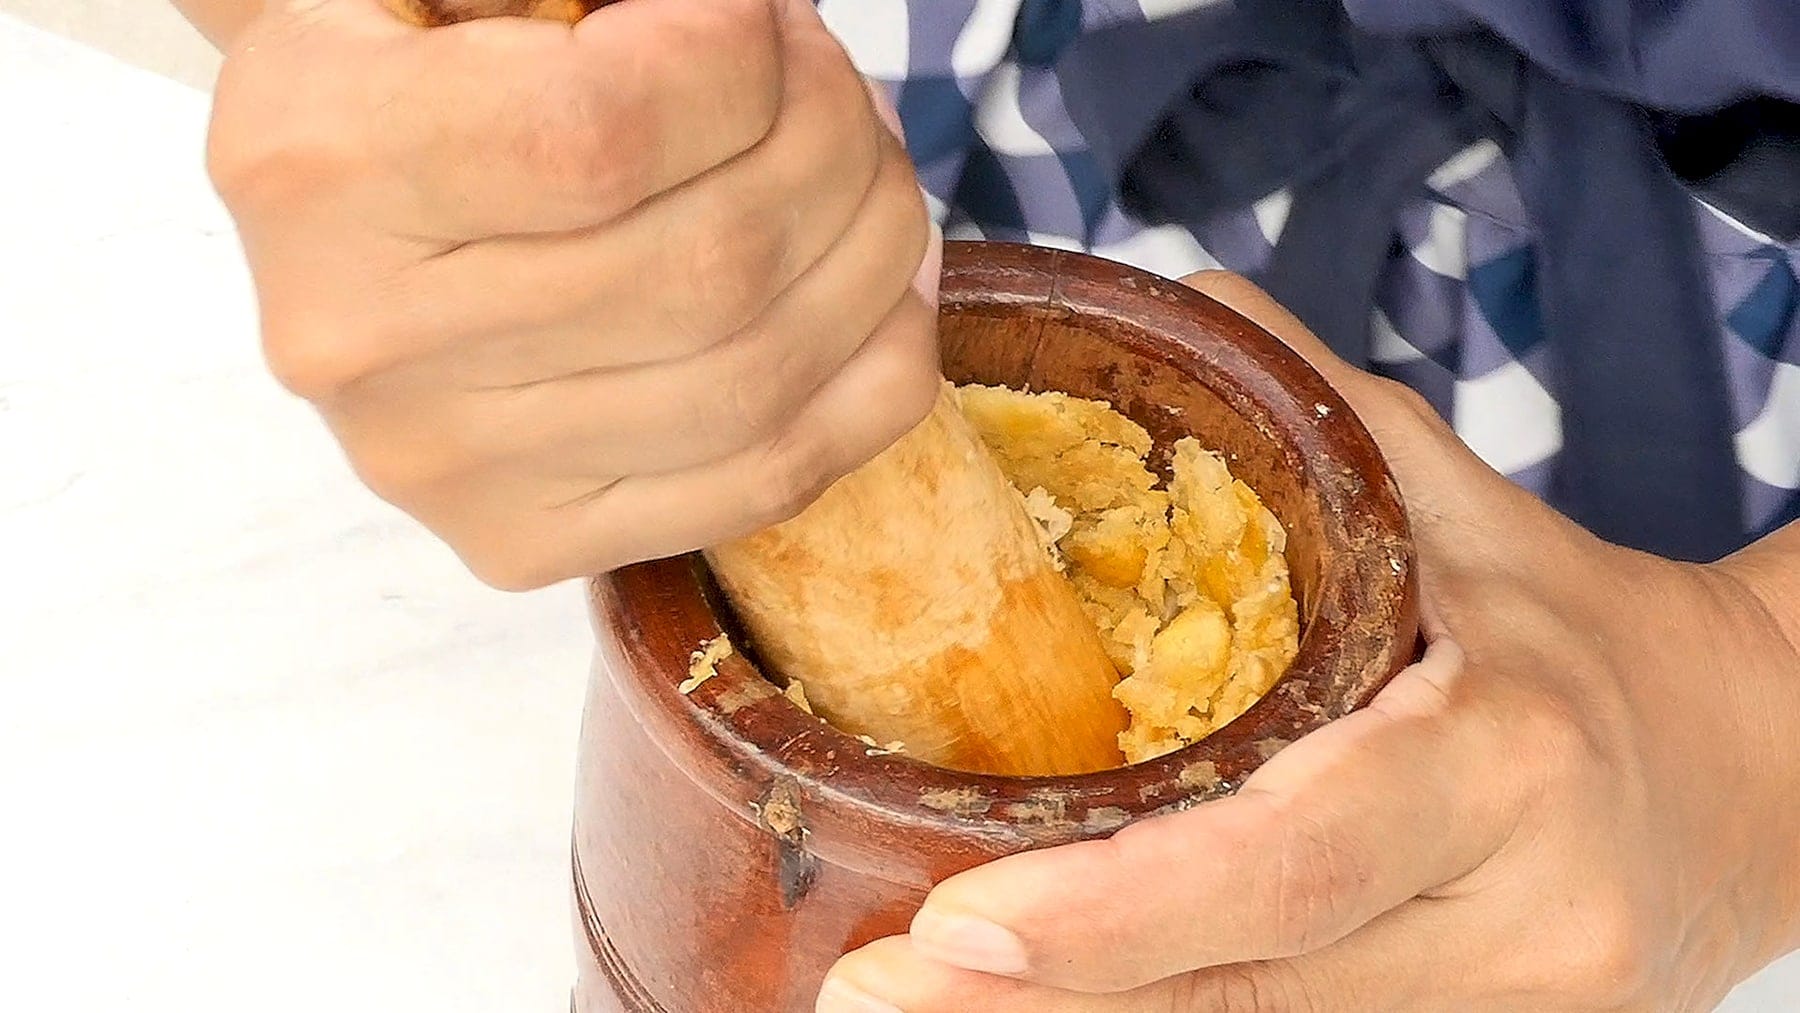
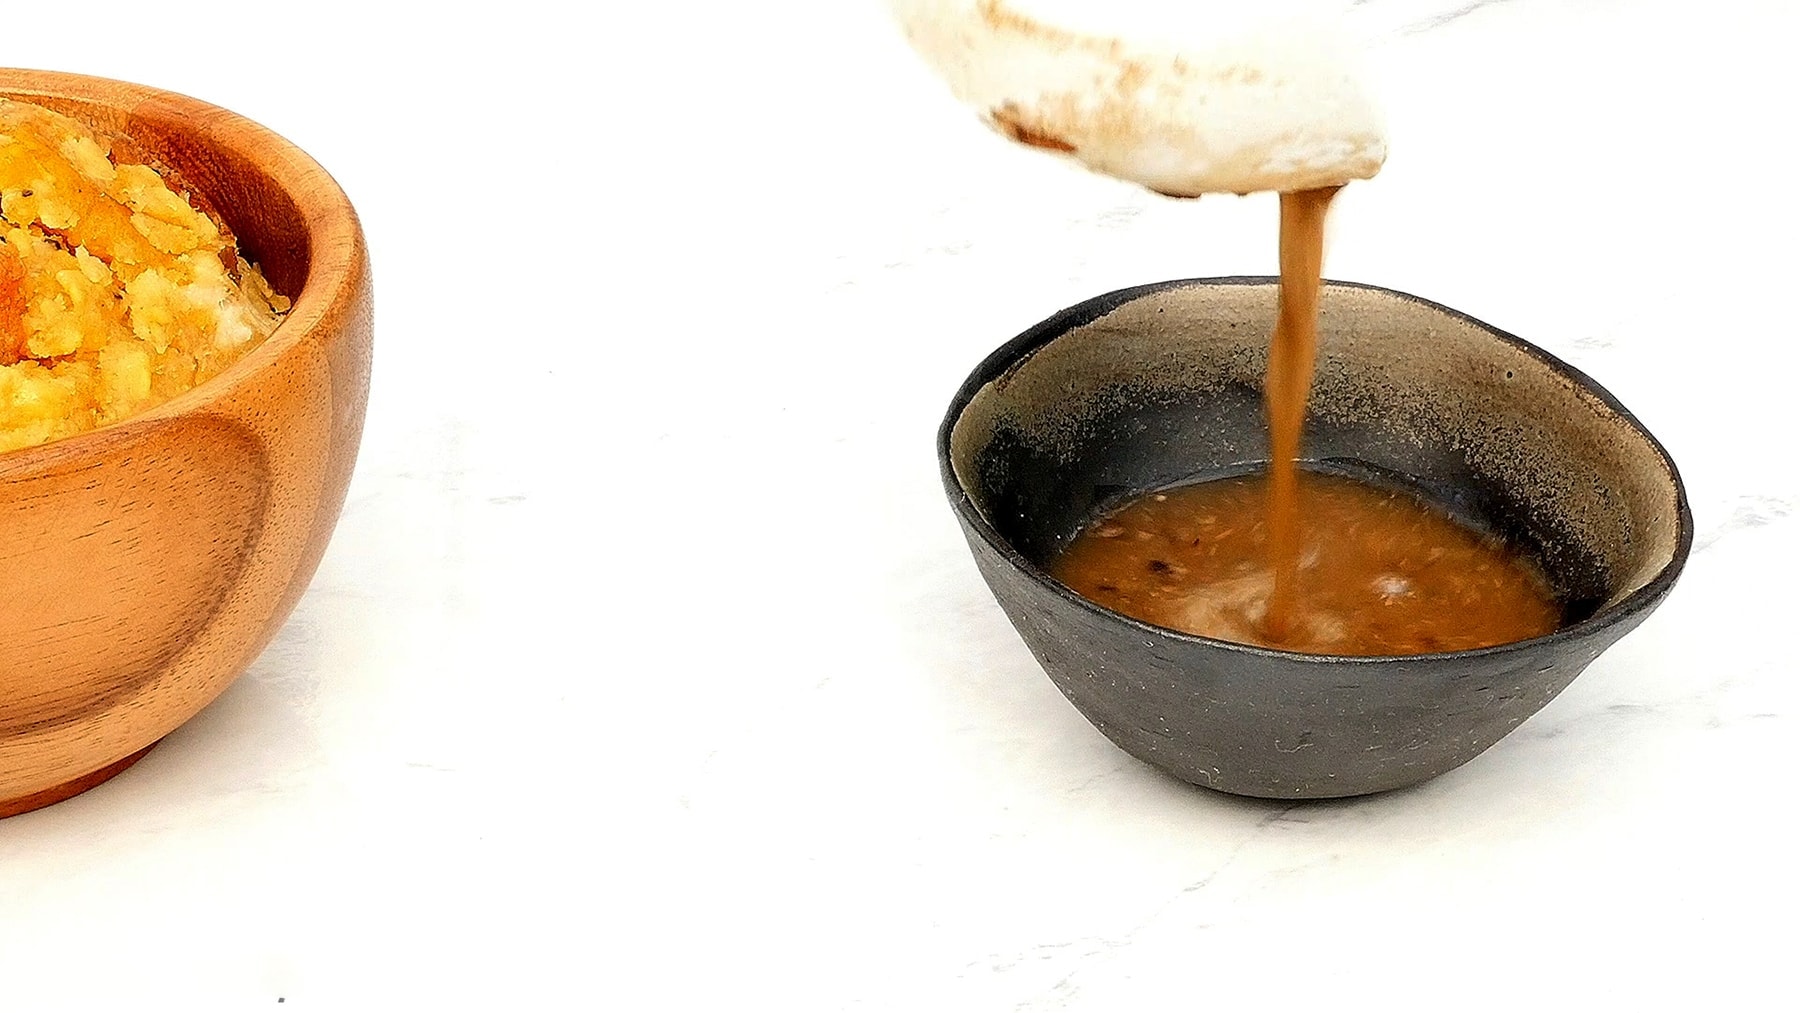
    • Shape the mixture into 6 balls and place each in a small bowl.Place the balls into the serving plates, and garnish with the broth, that you’ll use to pour over and moisten the mofongo balls.

    How to make old-style Dominican mofongo

    1. Roast the plantains

    • Wrap the plantains in aluminum foilBake plantains in a preheated oven at 400ºF [200ºC] for 35 minutes, or cook in an air fryer preheated to 350ºF [175ºC]

    2. Sauté the garlic

    Simultaneously, in a pan, heat olive oil over very low heat. Stir in the garlic and sprinkle it with salt. Cover the pan and sauté for 10 minutes, occasionally stirring and ensuring the heat remains low enough to prevent the garlic from burning or changing to a dark color. Once done, set it aside for later use.**

    3. Mash the plantains

    • Remove the plantains from the oven and let them cool down for 5 minutes. Moving on, carefully peel the plantains. Start smashing the plantains one by one in a mortar and pestle, adding to each plantain ¼ of the oil and garlic and ¼ of the pork cracklings while you mash and mix.

    4. Serve

    • Form each plantain mash into a dome, or scoop it into a bowl. Serve 4 servings of the broth – alongside each mofongo bowl – that you’ll use to pour over and moisten the mofongo balls.
  • Quick and Easy Tuna Kimbap Rice Balls: A Simple Korean Snack

    Korean Rice Balls, also known as “Jumeok Bap.” These delicious rice balls are often made with a flavorful filling and are a popular snack or side dish in Korean cuisine. In this recipe, we’ll make Tuna Kimbap Rice Balls, a variation of Jumeok Bap with a tuna and vegetable filling.

    Ingredients:

    For the Rice Balls:

    • 2 cups cooked sushi rice – rice should be warm for easier handling
    • 2 tablespoons rice vinegar
    • 1 teaspoon sugar
    • 1/2 teaspoon salt

    For the Tuna Filling:

    • 1 can (5 oz) tuna, drained
    • 2 tablespoons mayonnaise
    • 1 teaspoon soy sauce
    • 1/2 teaspoon sugar
    • 1/2 teaspoon sesame oil
    • A pinch of black pepper

    For Assembly:

    • Roasted seaweed sheets
    • Toasted sesame seeds (optional)
    • Salt, for seasoning (optional)

    Instructions:

    1. In a small bowl, mix the warm sushi rice with rice vinegar, sugar, and salt. This will season the rice and give it a slightly tangy flavor. Let the rice cool slightly so it’s easier to handle.
    2. In a separate bowl, prepare the tuna filling. Combine the drained tuna with mayonnaise, soy sauce, sugar, sesame oil, and black pepper. Mix well to create a flavorful tuna salad.
    3. Wet your hands with a bit of water to prevent the rice from sticking, and take a small handful of the seasoned rice.
    4. Flatten the rice in your palm to form a small disc.
    5. Place a spoonful of the tuna filling in the center of the rice disc.
    6. Carefully encase the filling by folding the rice around it, forming a ball shape. Press gently to make sure it holds together.
    7. Put seaweed, sesame and salt in blender and blend together.
    8. Let the rice balls be coated with seaweed sesame seeds. The seaweed and sesame will add a delicious crunch and flavor to the rice ball.
    9. Repeat the process with the remaining rice and filling to make more rice balls.
    10. Serve your Tuna Kimbap Rice Balls as a snack, side dish, or part of a Korean-style bento box.

    Now you can make these quick and easy Tuna Kimbap Rice Balls for a delicious and flavorful Korean snack that’s so convenient. With just a minimal amount of effort, each bite is full of rich flavor, perfect for satisfying your cravings anytime, anywhere.

  • Savor the Flavors of Korea: Gourmet Seafood Pancakes with Special Dipping Sauce

    Korean Seafood Pancakes, also known as “Haemul Pajeon.” These savory pancakes are a popular Korean dish, and they’re often enjoyed as an appetizer or side dish. You can customize them with a variety of seafood and vegetables to your liking. Here is the fast and easy recipe for this dish.

    Preparation Time: 20-25 minutes

    Ingredients:

    For the Pancake Batter:

    • 1 cup all-purpose flour
    • 1 cup water
    • 1 egg
    • 1/2 teaspoon salt
    • 1/2 teaspoon soy sauce
    • 1/2 teaspoon sesame oil

    For the Seafood and Vegetables (Feel free to adjust the ingredients as per your preference):

    • 1/2 cup small shrimp, peeled and deveined
    • 1/2 cup small squid or calamari rings
    • 1/2 cup mussels or clams (shelled)
    • 1/2 cup sliced green onions
    • 1/2 cup sliced red bell pepper
    • 1/2 cup sliced zucchini or other vegetables
    • 2-3 cloves garlic, minced

    Frying:

    • Vegetable oil for frying

    Dipping Sauce:

    • 2 tablespoons soy sauce
    • 1 tablespoon rice vinegar
    • 1/2 teaspoon sugar
    • 1/2 teaspoon sesame oil
    • 1/2 teaspoon toasted sesame seeds

    Instructions:

    1. In a large mixing bowl, combine the flour, water, egg, salt, soy sauce, and sesame oil. Mix until you have a smooth batter. It should be thicker than a typical pancake batter but not too thick.
    2. Add all the seafood, sliced vegetables, and minced garlic to the batter. Mix everything together, ensuring that the ingredients are evenly coated with the batter.
    3. In a large skillet or frying pan, heat a generous amount of vegetable oil over medium-high heat. You’ll want enough oil to coat the bottom of the pan generously.
    4. When the oil is hot, ladle a portion of the pancake batter mixture into the pan, spreading it out into a round shape. You can make a smaller pancake or a larger one, depending on your preference.
    5. Cook the pancake for 3-4 minutes on each side, or until it’s golden brown and crispy. Use a spatula to flip the pancake.
    6. Continue making and frying the pancakes in batches, adding more oil to the pan as needed.
    7. While the pancakes are frying, mix together the ingredients for the dipping sauce: soy sauce, rice vinegar, sugar, sesame oil, and sesame seeds. Adjust the seasoning to your taste.
    8. Once the pancakes are cooked, remove them from the pan and let them drain on a paper towel to remove excess oil.
    9. Serve the Korean Seafood Pancakes hot, with the dipping sauce on the side. Cut the pancakes into wedges or squares for easy sharing.

    Approximate nutrition facts for a typical serving (1 pancake) of Korean Seafood Pancakes (Haemul Pajeon):

    • Calories: 150-200 calories
    • Protein: 6-8 grams
    • Carbohydrates: 15-20 grams
    • Dietary Fiber: 1-2 grams
    • Sugars: 1-2 grams
    • Fat: 7-10 grams
    • Saturated Fat: 1-2 grams
    • Cholesterol: 30-40 mg
    • Sodium: 300-400 mg

    Now you can delight in the rich flavors of Korean Seafood Pancakes (Haemul Pajeon) with a sublime Soy-Sesame Dipping Sauce in just 20-25 minutes of preparation time. This savory dish combines a delectable medley of seafood and vegetables, creating a culinary masterpiece that’s perfect for sharing with family and friends.

    Here is a reference video link for seafood pancake: https://youtube.com/shorts/WhmENVNkd4Q?si=xQQNkpBqhjlL_oUi


    Check out for more of our recipes in our Website: https://easybites.comd-whysel.org/

  • Culture Mexican Food Sopes Seasons Recipes

    Cultural Mexican food that is simple to make for any occasion with friends and family to share with anyone. It’s also a good bonding for others to try and share a cultural food. This is good dish for everyone to try and add any toppings of your personal choice for everyone to enjoy.

    PREP:10minutes minutes

    COOK:20minutes minutes

    TOTAL :30minutes minutes

    Ingredients for Sopes of Cultural Mexican

    • Masa harina: The base of plenty of delicious Mexican recipes, masa harina is made from dried maize corn. This ground corn flour is used to make corn tortillas, atole, tamales, and more.
    • Oil: You’ll need olive oil to add moisture to the dough as well as vegetable oil if you plan on frying the sopes.
    • Salt: For flavor and balance in the dough.
    • Water: A simple mix of hot water, oil, masa harina, and salt is all that’s needed to form the sopes dough.

    Culture Mexican Toppings for Sopes Seasons Recipe

    Keep things simple with a generous helping of refried beans, queso fresco, picadillo, shredded chicken, barbacoa, or carne asada, chopped lettuce, thinly sliced cabbage, and chile de arbol salsa on top of your sopes. You can also add any leftovers such as little cilantro, diced onion, and your favorite hot sauce.

    Tips

    • When flattening the dough, make sure the dough is thicker than a regular corn tortilla. If you over-flatten the dough, simply gather the dough, roll it into a ball, and try again.
    • The dough should be firm and springy when touched, not dry or super sticky. If the mixture is too dry, add more water in small amounts until the dough is springy and holds together.
    • I prefer to use a gallon-size zip-top bag or parchment paper rather than plastic wrap when flattening the masa balls. Plastic wrap tends to stick to the dough and the tortilla press. A zip-top bag or parchment paper is hassle-free!

    Steps

    • In a large bowl, combine the masa harina and salt. Stir in the water and oil until a dough forms.
    • Using your hands, knead the dough until it fully comes together and all the water is absorbed, about 3 minutes. To make sure it’s ready, grab a small piece and roll it into a ball. Press down on it with a finger. If the edges of the dough crack, the dough is too dry. If the dough sticks to your skin, it’s too wet. Add more water or masa harina as necessary.
    • Divide the dough into 14 equal portions, then roll each into a ball. Cover them with a clean damp cloth or plastic wrap to keep the dough moist while you press and make the sopes.
    • Heat a griddle or skillet over medium-high heat until hot. While the griddle is heating up, cut the seams off of a large resealable plastic bag so that it makes one large rectangular piece of plastic. Alternatively, you can use parchment paper instead.
    • Lay the plastic or parchment paper on the open tortilla press and place 1 dough ball on the bottom half. Fold the other side of the plastic or parchment paper over the dough and gently close and press the upper portion of the tortilla press to flatten it out. Open the tortilla press, carefully peel back the plastic or parchment paper, and transfer the dough to your hand. It should be slightly thicker than a typical corn tortilla.
    • Cooking 1 or 2 at a time, place the dough on the hot griddle and cook for 15 to 20 seconds. Flip and cook the other side for 15 to 20 more seconds. Both sides of the dough should looks cooked and lightly seared. You don’t want to cook it all the way through like a corn tortilla.
    • Transfer the dough to a plate and let it cool for about 30 seconds. When cool enough to handle, pinch the edges around the entire dough using your thumb and index finger to create a rim. (see photos in post for examples)
    • Cover the sope with a towel and repeat until all the sopes have been formed.
    • To bake: Preheat oven to 400°F. Transfer the sopes to 2 large baking sheets and bake for 5 minutes to fully cook the sopes.
    • To fry: Heat vegetable oil in a large skillet over medium-high heat. Once the oil is hot, fry the sopes 2 or 3 at a time, flipping frequently, for about 2 minutes until light golden brown. Drain the sopes on paper towels or a wire rack.
    • Serve the sopes with desired toppings like beans, cheese, ground beef, shredded chicken, shredded lettuce, salsa and enjoy!

    To store, keep the cooked sopes in an airtight container in the fridge for up to 1 week. You can also freeze them for up to a month. Leave the frozen sopes to thaw in the fridge overnight before reheating.

    To reheat, pan-fry or bake the sopes for a few minutes or until they’re back at the desired level of crispiness.

    Nutritional Facts:

    Serving: 1sope Calories: 62kcal (3%) Carbohydrates: 12g (4%) Protein: 2g (4%) Fat: 1g (2%) Saturated Fat: 1g (5%) Sodium: 112mg (5%) Potassium: 43mg (1%) Fiber: 1g (4%) Vitamin A: 35IU (1%) Calcium: 22mg (2%) Iron: 1mg (6%)

    Credits to Isabel Eats https://www.isabeleats.com/

  • Chicken Enchilada

    This is a Mexican food that everyone should try. Enchiladas are made in many different ways but here is a recipe that is easy to follow for everyone to enjoy. This goes well with eating during the morning, afternoon, or even in the evening.

    PREP: 10 minutes

    COOK: 20minutes

    TOTAL: 30 minutes

    Ingredients

    • 1 ½ cups cooked shredded chicken
    • 2 cups easy enchilada sauce, divided
    • 8 corn or flour tortillas (see note if using flour tortillas)
    • 2 ½ cups shredded Mexican-blend cheese, divided
    • salt and black pepper, to taste
    • optional toppings: diced onions, chopped cilantro, sour cream, shredded lettuce, cotija cheese

    Steps

    • Preheat oven to 350ºF. In a large bowl, combine the shredded chicken, ¼ cup enchilada sauce and a generous pinch of salt and pepper. Mix together and taste. Season with more salt and pepper as needed.
    • If using corn tortillas: Wrap the tortillas in a damp paper towel and heat them in the microwave for 1 minute, flipping the them halfway through until all of them are warm and pliable.If using flour tortillas: Microwave the tortillas on a plate for 1 minute, flipping them halfway through until all of them are warm and pliable.
    • Assemble the enchiladas by filling each tortilla evenly with the shredded chicken mixture and 1 cup of shredded cheese. Roll the tortillas tightly to close and place in large baking dish seam side down.
    • Pour the remaining 1 ¾ cup enchilada sauce over the tortillas, top with the remaining 1 ½ cups shredded cheese, and bake for 20 minutes until the cheese is melted and bubbly.
    • Serve immediately and garnish with desired toppings.

    Enchilada Sauce

    Ingredients

    Dried chiles: If you’d like to make this sauce as mild as possible, I recommend removing and discarding the seeds of the dried chiles in addition to the stems.

    Mexican chocolate: If you don’t have Mexican chocolate, you can substitute 1 teaspoon unsweetened cocoa powder and 1 teaspoon turbinado/raw sugar instead.

    Steps

    1. In a large bowl, add dried chiles and hot water. Cover bowl with a large plate or plastic wrap and let the chiles soak for 20 minutes.
    2. Using a slotted spoon, transfer the softened chiles into a large blender.
    3. Add in 1 cup of the chile-soaked water, 1/2 cup of fresh water, the garlic, salt and Mexican chocolate.
    4. Puree until completely smooth. This step may take a few minutes depending on the power of your blender. Add more water if the sauce is too thick for your liking.
    5. Cover and store until ready to use. Perfect for chicken enchilada.

    Nutritional Facts

    Serving: 2enchiladas Calories: 371kcal (19%) Carbohydrates: 25g (8%) Protein: 24g (48%) Fat: 19g (29%) Saturated Fat: 10g (50%) Polyunsaturated Fat: 1g Monounsaturated Fat: 0g Trans Fat: 0g Cholesterol: 50mg (17%) Sodium: 800mg (33%) Potassium: 130mg (4%) Fiber: 4g (16%) Sugar: 4g (4%) Vitamin A: 1350IU (27%) Vitamin C: 0mg Calcium: 420mg (42%) Iron: 1.1mg (6%)

    Credits goes to Isabel Eats https://www.isabeleats.com/red-chicken-enchiladas/

  • Eggplant and Chicken Casserole: A Flavorful Chinese Delight.

    “Eggplant Casserole” is a flavorful Chinese dish featuring tender chunks of eggplant, chicken (or your choice of protein), and a savory sauce. It’s a delightful fall meal that can be tailored to your taste preferences with various seasonings. Serve it over rice for a delicious and comforting dinner.

    The preparation time for Eggplant Casserole typically takes around 15 to 20 minutes.

    Ingredients:

    • 4 medium-sized eggplants, cut into chunks
    • 2 chicken thighs, cut into pieces (you can also use other meats or tofu as a substitute)
    • 1 onion, thinly sliced
    • 4 cloves of garlic, thinly sliced
    • 1 piece of ginger, thinly sliced
    • 2 green onions, chopped into sections
    • 2 tablespoons cooking oil
    • 2 tablespoons soy sauce
    • 1 tablespoon sugar
    • 1/2 cup water or chicken broth
    • Salt and pepper, to taste
    • Red chili pepper (optional, to taste)

    Cooking Steps:

    1. Heat the Pan and Sauté the Eggplant:
      • In a large pan, heat oil over medium heat and add the eggplant chunks. Stir-fry for a few minutes until the eggplant starts to soften and turn slightly golden.
    2. Add Onion, Garlic, and Ginger:
      • Add the sliced onion, garlic, and ginger to the pan. Continue to stir-fry for a few minutes until they become fragrant.
    3. Incorporate Chicken (or Meat/Tofu):
      • Add the chicken thigh pieces (or your choice of meat or tofu) to the pan and stir-fry for a few minutes until the meat changes color.
    4. Seasoning:
      • Pour in the soy sauce, sugar, and add salt and pepper to taste. If you prefer a spicy dish, you can also add some chopped red chili pepper at this stage.
    5. Add Water or Chicken Broth:
      • Pour in water or chicken broth, then cover the pan with a lid. Let it simmer for about 10-15 minutes until the eggplant and meat are fully cooked.
    6. Final Seasoning:
      • Lastly, add the chopped green onions, stir to combine, and cook for an additional 1-2 minutes to meld all the flavors together.
    7. Serve:
      • Plate the eggplant casserole and serve it with rice.

    This is a delicious, savory Chinese dish with rich sauce and tender eggplant. It pairs well with chicken or other proteins and is perfect for a fall dinner. You can adjust the ingredients and seasonings to your taste preferences. Enjoy!